


Plugin information
| Version | 1.1.15 |
|---|---|
| Author | Dataiku (Pat Masi-Phelps) |
| Released | 2024-05 |
| Last updated | 2025-07 |
| License | Apache Software License |
| Source code | Github |
| Reporting issues | Github |
With this plugin, you can train machine learning models and then use them to score new records, all within your Snowflake environment. This no-code UI allows data scientists and domain experts to quickly train models, track experiments, and visualize model performance.
Capabilities
- No-code ML model training on Snowpark using Snowflake’s [snowflake-ml-python](https://pypi.org/project/snowflake-ml-python/) package
- Two-class classification, multi-class classification, and regression tasks on tabular data stored in a Snowflake table
- Hyperparameter tuning using Random Search on certain algorithm parameters
- Track hyperparameter tuning and model performance through Dataiku’s Experiment Tracking MLflow integration
- Output the best trained model to a Dataiku Saved Model in the flow, and deploy the model to a Snowflake Model Registry
- No-code ML batch scoring in Snowpark using a trained model (from the training recipe of this plugin)
- Macro to clean up models from the Snowflake Model Registry that have been deleted from the Dataiku project
Limitations
- If doing two-class or multi-class classification, convert your target column to numeric (0,1) or (0, 1, 2, 3, 4) before using this plugin (this is a SnowparkML requirement)
- No int type columns can have missing values. If you have an int column with missing values, convert the type to double before this recipe (this is an MLflow requirement)
- If you want to treat a numeric column as categorical, change its storage type to string in a prior recipe
Other Requirements
- Must have a Snowflake connection. Plugin recipe Input + Output tables should be in the same Snowflake connection
- The Snowflake role used must either own the schema where the Input + Output tables live, or have the CREATE MODEL privilege on it
- Python 3.9 available on the instance
- Snowpark-optimized Snowflake warehouse available for model training. Multi-cluster warehouse will allow for parallelized hyperparameter tuning
Setup
Build the plugin code environment
Right after installing the plugin, you will need to build its code environment. Note that this plugin requires Python version 3.9 and that conda is not supported.
Build ANOTHER python 3.9 code environment
Name it “py_39_snowpark”
Under “Core packages versions”, choose Pandas 2.2
Add these packages, then update the environment:
numpy==1.23.5

scikit-learn==1.4.2

mlflow==2.17.2

statsmodels==0.13.5

protobuf==3.20.3

xgboost==1.7.6

lightgbm==4.1.0

matplotlib==3.7.1

scipy==1.10.1

MarkupSafe==2.0.1

cloudpickle==2.2.1

flask==2.1.3

snowflake-ml-python==1.8.5

Jinja2==3.1.5
Usage
Training models with Snowpark ML
Create the train plugin recipe and outputs
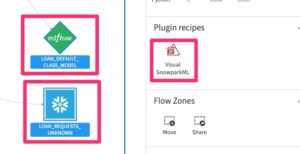
Click once on the input dataset (with known, labeled target values), then find the Visual SnowparkML plugin:
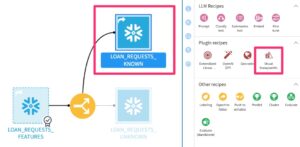
Click the train recipe:

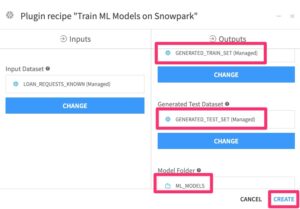
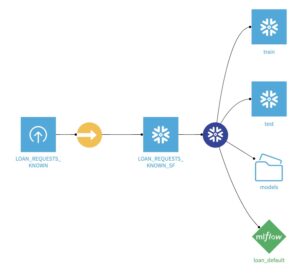
Create two output Snowflake tables to hold the generated output train/test sets, and one managed folder to hold saved models (connection doesn’t matter):
Design your ML training process and run the recipe
Make sure you fill out all required fields
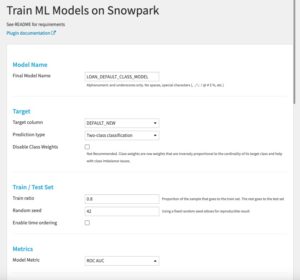
Below is an example for a two-class classification problem: Parameters
- Final model name: the name of your model
- Target column: the name of your target column to predict
- Prediction type: either two-class classification or regression
- Disable class weights: choose to disable class weights (not recommended). Class weights are row weights that are inversely proportional to the cardinality of its target class and help with class imbalance issues
- Train ratio: train set / test set ratio. 0.8 is a good start
- Random seed: Set this (to any integer) to maintain consistent train/test sets over multiple training runs
- Enable time ordering: order the train and test sets by a datetime column (test set will be more recent timestamps than train set)
- Metrics: metric to optimize model performance
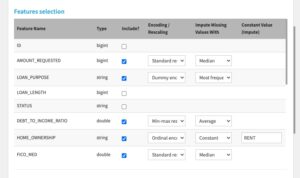
Features selection When you include a feature, don’t leave the “Encoding / Rescaling” and “Impute Missing Values With” dropdowns empty!
- Type: underlying storage type. Note: if you want to treat a numeric column as categorical, change its storage type to string in a prior recipe
- Include: whether to include the column in the model
- Encoding / Rescaling: choose how to encode categorical features, and rescale numeric features.
- Impute Missing Values With: choose how to deal with missing values
- Constant Value (Impute): if “Constant” chosen for missingness imputation, the value to impute
Algorithms
- Select each algorithm you’d like to train
- For each algorithm, enter min and max values for each hyperparameter
- Enter a search space limit (randomly choose N hyperparameter combinations for each algorithm within the min/max values chosen)
- A Snowpark ML Randomized Search with 3-fold cross-validation will kick off in Snowflake to find the best hyperparameter combination for each algorithm


Snowflake Resources and Deployment
- Snowflake Warehouse: the warehouse to use for ML training. Strongly recommended to use a Snowpark-optimized Snowflake warehouse. A multi-cluster warehouse will allow for parallelized hyperparameter tuning.
- Deploy to Snowflake ML Model Registry: deploy the best trained model to a Snowflake ML Model Registry (in the same database and schema as the input and output datasets. See Snowflake access requirements [here](https://docs.snowflake.com/en/developer-guide/snowpark-ml/snowpark-ml-mlops-model-registry#required-privileges). This is required in order to run a subsequent Visual Snowpark ML Score recipe, to run batch inference in Snowpark using the deployed model.

Outputs
After running the train recipe successfully, you can find all model training and hyperparameter tuning information, including model performance metrics in Dataiku’s Experiment Tracking tab
![]()
![]()
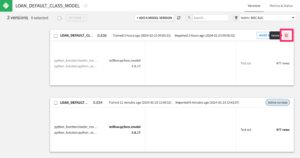
The best model will be deployed to the flow. If you selected “Deploy to Snowflake ML Model Registry”, the model will also be deployed to Snowflake’s Model Registry.
Scoring New Records with your Trained Model and Snowpark ML
Note: you can use a regular Dataiku Score recipe with the Snowpark ML trained model, however, the inference will happen in a local python kernel, and not in Snowflake. Note that for classification models where you did NOT disable class weights, you’ll need to add a SAMPLE_WEIGHTS column in your input dataset before a regular Dataiku Score recipe (this column can have all empty values).
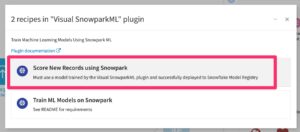
In order to run batch inference in Snowpark, use this plugin’s Visual Snowpark ML Score recipe. You must have checked “Deploy to Snowflake ML Model Registry” when training the model for this to work.
Create the score plugin recipe and outputs
Click once on the trained model and input dataset you’d like to make predictions for:
Click the score recipe:
Make sure you’ve selected the trained model and Snowflake table for scoring as inputs. Then create one output Snowflake table to hold the scored dataset. Then click “Create”:
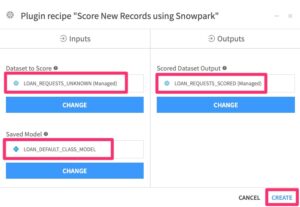
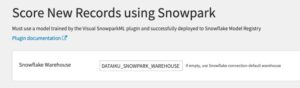
Optionally type the name of a Snowpark-optimized Snowflake warehouse to use for scoring. Leave empty to use the Snowflake connection’s default warehouse. Note: it’s less needed to use a Snowpark-optimized warehouse for inference compared to training. Click “Run”.
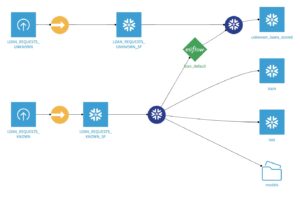
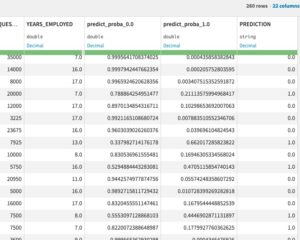
Your flow should look like this, and the output scored dataset should have prediction column(s):
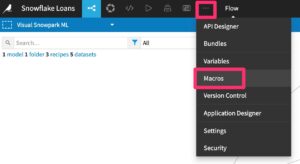
Clear SnowparkML Registry Models Macro
When deploying trained models to a Snowflake Model Registry, we want to ensure that any trained models that we delete from the Dataiku UI (by deleting a full green diamond saved model, or a saved model version underneath), are also deleted from the Snowflake Model Registry.
This macro checks for any models in the Snowflake Model Registry that have the Dataiku and the current project key tags; if the model has been deleted from the Dataiku project, this macro deletes the model from the Snowflake Model Registry.
You can list the models the macro would delete by un-checking the “Perform deletion” box.
The macro will show the model name and version deleted (or simulated) in the resulting list.
![]()
![]()