


Plugin information
| Version | 3.4.12 |
|---|---|
| Author | Teradata |
| Released | 2022-09 |
| Last updated | 2025-06-03 |
| License | MIT + Apache Software License |
| Source code | Github |
| Reporting issues | Teradata support |
With this plugin, you will be able to:
- Access and execute analytic functions that reside in the Teradata Vantage Analytics Database. The functions are comprised by the following sets:
- A select subset of the Analytics Database analytic functions.
- The entire Vantage Analytics Library (VAL) functions set.
- The Unbounded Array Framework (UAF) time series functions.
- Submit and run R and Python scripts natively in the Analytics Database for scaled and performant in-Vantage execution. The plugin provides interfaces to (a) the Open Analytics Framework and the APPLY Table Operator on VantageCloud Lake systems, and (b) the SCRIPT Table Operator on VantageCloud Enterprise and Vantage Core systems.
- Store Dataiku-built models or previously saved model files in Analytics Database tables; PMML, ONNX, native Dataiku, and H2O MOJO formats are supported.
- Run scaled scoring tasks in the Analytics Database via the Bring Your Own Model Analytics Database software with models you have previously stored in Analytics Database tables. The present plugin version supports scoring with models in PMML, ONNX, native Dataiku, and H2O MOJO formats.
- (For administrators) Collect telemetry information about the Dataiku-based session on a target Vantage system
Note that to use the plugin:
-
The present version of the plugin supports all Teradata Vantage systems (VantageCloud Lake, VantageCloud Enterprise, and Vantage Core.)
- You will need Teradata Vantage access credentials to establish a connection to a target Analytics Database.
- To connect to an Analytics Database, the Teradata JDBC Driver 20.00.00.34 or later is required. First, the driver can be downloaded from the website:
https://downloads.teradata.com/download/connectivity/jdbc-driver
Then, your administrator must install the Teradata JDBC Driver file on your Dataiku server per the directions on the page https://doc.dataiku.com/dss/latest/installation/custom/jdbc.html.
After the Teradata JDBC Driver is installed, and when a connection to a Teradata Vantage system is specified in Dataiku, simply observe the following driver-related details on the Connections page under the Dataiku Settings:- Specify the following properties under the “Advanced JDBC properties”:
- CHARSET: UTF8
- TMODE: TERA
- If your target system connection is LDAP-based, then also specify the property: LOGMECH: LDAP
- For VantageCloud system users, communication errors can be avoided by specifying the property: ENCRYPTION: TRUE
- Check the “Autocommit mode” button to enable the autocommit mode.
- Specify the following properties under the “Advanced JDBC properties”:
How to set up the plugin
The Teradata plugin supports Dataiku versions 9.0.0 and forward. The plugin version 3.3.11 supports Dataiku versions 9.x through 11.x. The plugin version 3.3.12 supports Dataiku versions 12.0.0 and onward. If installing from within Dataiku, then the server automatically fetches the appropriate plugin version for your Dataiku version. If installing explicitly from the plugin zip file, then please follow the link in the side window “Install in DSS” on the top of this page and obtain the zipped version in the folder corresponding to your Dataiku version.
Right after installing the plugin, you will need to build its code environment.
– Python version 3.8, 3.9, 3.10, or 3.11 is required for all supported Dataiku versions.
Please ensure a suitable Python interpreter version is present on your Dataiku server. When creating the code environment, you can accept the default recommendation to have it managed by Dataiku. If you are updating the plugin, then you might be prompted, and can accept, to retain any compatible existing code environment of the previously installed version.
Deprecation Note: The next release of Teradata Plugin, version 4.0, will no long support Dataiku versions 11 or earlier. There will only be support for Dataiku versions 12 and later.
The plugin requires the following dependency packages that are fetched when you build its code environment:
- pandas>=0.23.4
- teradatasqlalchemy>=17.0.0.2
- SQLAlchemy>=2.0.34
- httpx>=0.27.2
- psutil
- keyring
- keyrings.cryptfile
- PyJWT>=2.4.0
- anyio>=4.4.0
- Go to the Applications button on the right side of the Dataiku top banner and select the Plugins page. Once on the page, select the Installed tab on the top of the screen
- Push the RELOAD ALL button on the top right corner of the screen.
- Proceed to to your project flow and refresh the page.
- The target Analytics Database must be of version 16.20 or later.
- To use the “In-Vantage Scripting” recipe
a) with VantageCloud Lake systems:- Your target system must be equipped with a compute cluster component which has at least one analytic compute group so the Open Analytics Framework can be used. Furthermore, your Analytics Database Administrator must grant your Analytics Database user account with access privileges to an analytic compute group.
- The analytic compute group name you wish to use and have access to on your target system can be specified in your connection’s advanced params properties within the Post-connect commands field. The statement to run after the connection is created should be specified in this field as:
SET SESSION COMPUTE GROUP group_name;
where group_name is the name of the analytic compute group you have access to on your target system. See also the section In-Vantage Scripting recipe in the following.
- b) with VantageCloud Enterprise or Vantage Core systems:
- the corresponding language bundles need to be installed directly on each node of the target Analytics Database per the following table:
PID Product name 9687-2000-0120 R Interpreter and Add-on Pkg on Teradata Advanced SQL 9687-2000-0122 Python Interpreter and Add-on Pkg on Teradata Advanced SQL - your Analytics Database Administrator must grant to the Analytics Database user account the additional following privileges in advance:
GRANT EXECUTE FUNCTION ON td_sysfnlib.script TO user;
Note: The preceding can be alternatively granted to a role instead of a user account.
GRANT EXECUTE PROCEDURE ON SYSUIF.INSTALL_FILE TO user;
GRANT EXECUTE PROCEDURE ON SYSUIF.REPLACE_FILE TO user;
GRANT EXECUTE PROCEDURE ON SYSUIF.REMOVE_FILE TO user;
GRANT EXECUTE ON SYSUIF.DEFAULT_AUTH TO user;
GRANT CREATE EXTERNAL PROCEDURE ON user TO user;
GRANT DROP PROCEDURE ON user TO user;
If your input data for the SCRIPT Table Operator should reside in a database other than your default user database, then your Analytics Database Administrator must also grant to the user in advance some of the above privileges on the database as follows:
GRANT EXECUTE FUNCTION ON td_sysfnlib.script TO database WITH GRANT OPTION;
GRANT EXECUTE ON SYSUIF.DEFAULT_AUTH TO database WITH GRANT OPTION;
GRANT CREATE EXTERNAL PROCEDURE ON database TO user;
GRANT DROP PROCEDURE ON database TO user; - a database name must be specified in your connection’s advanced connection properties as the value to the special property STO_DATABASE. This database is meant to host the files you wish to upload to the target server for in-Database execution. See also the section In-Vantage Scripting recipe in the following.
-
If your Dataiku server is UIF-enabled, then you need to edit your target Teradata Vantage system connection. In particular, under the “Advanced JDBC properties” specify the property:ELICIT_FILE_PATH: $USER_HOME/dataiku-plugin-tmp/where $USER_HOME should be the explicit path to the home directory of a UNIX <user> which runs the DSS software.Example: Linux systems most typically define the home directory of a <user> as /home/<user> and the above property should look like:ELICIT_FILE_PATH: /home/<user>/dataiku-plugin-tmp/For additional details, see section “SCRIPT Table Operator” in section “3. In-Vantage Scripting recipe” of the present documentation.
- the corresponding language bundles need to be installed directly on each node of the target Analytics Database per the following table:
- To use the “BYOM Scoring” recipe, the Teradata Vantage BYOM software package must be installed on the target Analytics Database, and you need to have execute privilege on the installation database; see the related BYOM documentation at the following link:
https://docs.teradata.com/r/Enterprise_IntelliFlex_Lake_VMware/Teradata-VantageTM-Bring-Your-Own-Model-User-Guide
In the Teradata Vantage Analytics Database, the default installation location of the BYOM software is a database called mldb. In line with the preceding, your Analytics Database Administrator needs to grant your Database user account in advance the privilege
GRANT EXECUTE FUNCTION ON mldb TO user WITH GRANT OPTION;
on mldb. If BYOM is installed in a different database on your system, then your Analytics Database Administrator needs to grant you the above privilege on the corresponding database, instead. - To use the functions in the “Teradata Analytic Functions” recipe, a default database must be specified in your Teradata connection settings.
- In addition, to use the VAL functions in the “Teradata Analytic Functions” recipe
- the Vantage VAL software package must be installed on the target Analytics Database. If VAL is not installed in a publicly available account or database on the target Analytics Database, then each user account who needs to run the analytic functions needs suitable privileges granted by the following statements:
GRANT EXECUTE PROCEDURE ON val.td_analyze TO user;
GRANT EXECUTE FUNCTION ON val.tda_dt_calc TO user;
GRANT EXECUTE FUNCTION ON val.tda_kmeans TO user;
GRANT SELECT ON stats_dbname TO user;
In the preceding, we assume val to be the target VAL installation database, and stats_dbname to be the database where the VAL Statistical Test Tables are installed.
Alternatively, the preceding privileges can be granted to a role instead of a user. For more information, see the related VAL documentation at
https://docs.teradata.com/r/Enterprise_IntelliFlex_Lake_VMware/Vantage-Analytics-Library-User-Guide - a database name must be specified in your connection’s advanced connection properties as the value to the special property VAL_DATABASE. This name must be the target VAL installation database name. See also the section Teradata Analytic Functions recipe in the following.
- the Vantage VAL software package must be installed on the target Analytics Database. If VAL is not installed in a publicly available account or database on the target Analytics Database, then each user account who needs to run the analytic functions needs suitable privileges granted by the following statements:
How to use the plugin
1. Introduction
The Teradata plugin recipes provide wrapper objects for objects in the Teradata Vantage Analytics Database, so that you can access and use a broad range of Teradata Vantage analytical tools, and push analytical tasks in the Analytics Database for scaled and efficient computations—all so from the convenience of the Dataiku environment. As a general rule of thumb, to run the plugin recipes as a non-admin user, remember to specify in your Vantage connection security settings the item “Details readable by:” to the “Every Analyst” value; see Figure 1.1. If you should lack the necessary permissions for a recipe, then the recipe produces a related message on the top as soon as you access it.

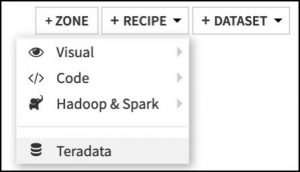
To use the Teradata plugin in your project flow, go to the flow view of your project, click on the +RECIPE button, then select the Teradata plugin; see Figure 1.2.
Then proceed to select the desired item from the list of available recipes in the plugin; see Figure 1.3. The recipes are described in detail in the following sections.
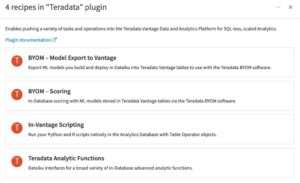
2. Teradata Analytic Functions recipe
The Teradata Analytic Functions recipe integrates Dataiku wrappers for the following 3 groups of functions:
- Native analytic functions in the Teradata Vantage Analytics Database.
In particular, the present version of the plugin provides wrappers for a broad selection of Analytic Functions that cover all Analytics Database versions through 17.20.
For a complete listing, usage and syntax details of each of these functions, visit the Teradata documentation page https://docs.teradata.com/r/Enterprise_IntelliFlex_VMware/Database-Analytic-Functions. - The entire range of the Vantage Analytics Functions (VAL) library.
For a complete breakdown of the VAL functions and syntax, see the details on the page
https://docs.teradata.com/r/Enterprise_IntelliFlex_Lake_VMware/Vantage-Analytics-Library-User-Guide.
To use any of the VAL functions, you must first specify in your target connection’s advanced connection properties the special property VAL_DATABASE. Its value must be the database name where VAL is installed in your connected Analytics Database. You can further choose to keep this property secret by checking the nearby “Secret” button; in our use case example, we leave this button unchecked. Also, if you no longer need the property, then you can remove it by clicking on the red trash can icon button on the right-most end of the property row. If the custom property VAL_DATABASE is not specified in the Teradata connection you use with the Teradata Analytic Functions recipe, then an error will occur when you attempt to specify the recipe settings for a VAL function.
In addition, your user account for the target Analytics Database must have been granted specific privileges on the VAL installation database, as detailed in the earlier section How to set up the plugin. - The Unbounded Array Framework (UAF) Time Series Functions. UAF is the Teradata framework for building end-to-end time series forecasting pipelines. For complete details about available functions in this collection and their syntax, visit the site https://docs.teradata.com/r/Enterprise_IntelliFlex_VMware/Teradata-VantageTM-Unbounded-Array-Framework-Time-Series-Reference-17.20.
All included functions can be invoked from the plugin interface with input Datasets from Vantage tables. Function execution is pushed into the Analytics Database.
Note: To use the Teradata Analytic Functions recipe, a default database must be specified in advance in your target Teradata connection settings; otherwise, an error will occur during recipe execution.
Note: Depending on the intended usage and individual functions syntax, some analytic functions might require specification of more than one input Dataset. Similarly, depending on the function, you might be able to specify multiple output Datasets. Check the corresponding documentation for the appropriate usage syntax of a function in advance, because the recipe does not check for consistency in the specified input/output of each analytic function. The recipe Inputs/Outputs window provides +ADD buttons for multiple inputs, if needed.
The main environment of the Analytic Functions recipe is the recipe Settings screen, where you are taken after you specify the recipe input and output. When landing on this screen, in the “Function Name” field you can type the desired function name straight away; as you type on, you will see possible options that match your typing, from which you can choose to auto-complete your function name choice. Alternatively, you can double-click in the “Function Name” field; then, as illustrated in Figure 2.1, a drop-down menu appears where you can scroll across the complete list of available functions in the recipe, and select the one you wish to use. The UAF time series functions names are prepended with the string “TD_”. The VAL functions are designated by the string “VAL” in the end of their name.
By default, the buttons next to the “Analytics Database” and “VAL” functions group titles are selected. The selection designates the recipe accounts for functions from all Analytic Functions groups in the “Function Name” field. Click on either button to exclude (when unchecked) or include (when checked) the functions in the corresponding group from your search.
Click on the “Version” button on the upper part of the screen (see Figure 2.2) to inquire about the Analytics Database version of the Teradata Vantage system you are connected to. The recipe will display for you only the analytic function titles that are available up to the specific version of the Analytics Database, and to the extent supported by the recipe.
Example: Assume a plugin version provides wrappers for analytic functions across Analytic Database versions through 17.20.
- If you are connected to an Analytics Database v.17.10, then the recipe will conveniently present you only the analytic function titles introduced up to v.17.10.
- If you should connect to an Analytics Database of version higher than 17.20, then the recipe will only present you with the analytic function titles introduced up to v.17.20.

Finally, when you assemble a function call in the recipe interface, you can push the “Query” button on the upper part of the screen to produce the SQL query format that is pushed into the Analytics Database for execution based on your specifications. While the syntax is incomplete or no function is selected, pushing the button will produce the note “No query present to report.”
In the following, we explore how to use the Analytic Functions recipe with one example for each of the categories of the Analytics Database analytic functions, the VAL functions, and the UAF time series functions.
Example 1
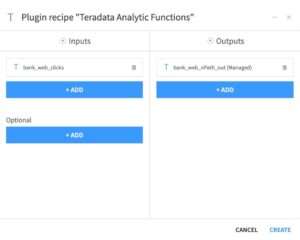
In this example, we illustrate an instance of using Analytics Database analytic functions by using the time series analysis function nPath. This function searches the input data for user-specified patterns and identifies paths that lead to an outcome. Assume a project flow with a Dataset “bank_web_clicks” that you wish to use as input for nPath. First, select the Teradata Analytic Functions recipe from the list of the Teradata plugin recipes.
In the pop-up window that follows up, specify the input and output Datasets; see Figure 2.3. The output Dataset will be stored in the database and schema corresponding to the connection selected in the Store Into field. Click on the CREATE button when done.
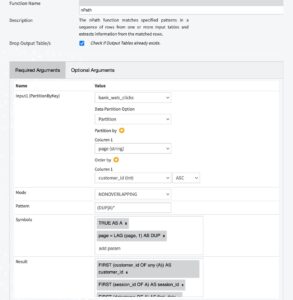
You are then transferred to the recipe settings screen, as illustrated in the preceding Figure 2.1. Specify the nPath function in the “Function Name” field. Upon the function specification, the screen adjusts and presents in separate tabs all suitable required and optional arguments for the selected function. Next to the pre-selected function input, one needs to further specify information about data partitioning and other function-specific parameters and attributes. We fill out the required arguments fields with the desired information for the specific analysis, as dictated by the nPath function syntax. We make no use of optional arguments in this example. In the end, our specifications look like the contents in Figure 2.4.
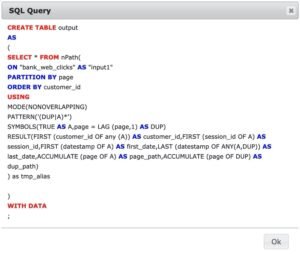
By pushing the “Query” button on the upper part of the screen, the recipe produces a pop-up window with the current query that will be sent to the connected Analytics Database for execution; see Figure 2.5.
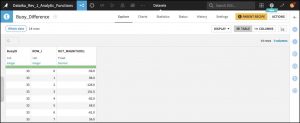
Upon running the recipe, the output Dataset is populated with data from the Analytics Database table that contains the function execution results, as was specified in the recipe outputs. A sample of the results is shown in Figure 2.6.
Example 2
In this example, we illustrate an instance of VAL functions in the recipe by building a flow with the Decision Tree, Decision Tree Evaluate and Decision Tree Predict VAL functions. By starting with an input Dataset of banking customer data, we will attempt building a small-depth, gain ratio-based decision tree to predict the customer gender by means of using information about customer age, income, and number of children. Assume a project flow with a Dataset “customer_analysis” that contains columns with the dependent features data.
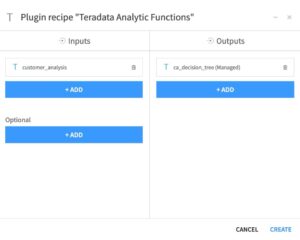
The initial task is to build the decision tree for our analysis. Select the Teradata Analytic Functions recipe from the list of the Teradata plugin recipes. In the pop-up window that appears, specify the input and output Datasets; see Figure 2.7. The output Dataset will be stored in the database and schema corresponding to the connection selected in the Store Into field. Click on the CREATE button when done.
After creating the recipe, its settings screen appears. Double-click on the “Function Name” field and select the “Decision Tree VAL” function from the drop-down menu. When done, the screen shows tabs with the required and optional arguments for the decision tree function. In the required argument fields, the input field is already picked up from the recipe input information. We then fill in 3 “Input Columns” fields with the parameter names “age”, “income”, and “nbr_children”. Observe that as a column name is typed, the recipe provides suggestions of possible columns in the table to select the correct one from. We further specify “gender” to be the response column name. The recipe then appears like in Figure 2.8.

Under the optional arguments tab, we specify “gainratio” in the “Algorithm” and “Pruning” fields, skip binning, and further specify we would like a maximum depth of 5 with 2 splits; see Figure 2.9.

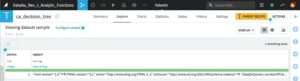
Executing this recipe produces the output Dataset that, as seen in Figure 2.10, essentially contains an XML string with details about the created model.
Back in our flow, we now create in the same manner a couple more Analytic Function recipes from our Teradata plugin. The first invokes the decision tree evaluate VAL function to produce a confusion matrix from the model; the second performs the prediction via the decision tree predict VAL function. Both recipes use the same inputs, namely, the “customer_analysis” and “ca_decision_tree” Datasets.
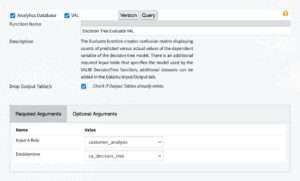
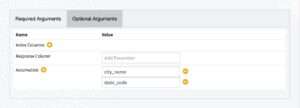
In the decision tree evaluate VAL function, the required arguments are the names of the input data Dataset and the decision tree model Dataset; see Figure 2.11. In the optional arguments tab, we only specify that we wish to accumulate by the “customer_analysis” Dataset columns “city_name” and “state_code”; see Figure 2.12.
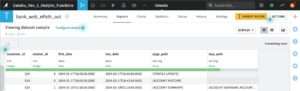
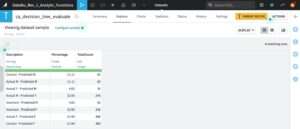
When the recipe is executed, the confusion matrix output is saved in the recipe output Dataset “ca_decision_tree_evaluate”, as shown in Figure 2.13.
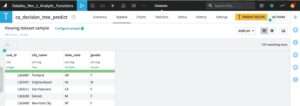
Eventually, we now want to perform the prediction task with our model. In the recipe with decision tree predict VAL function, the required arguments are again the names of the input data Dataset and the decision tree model Dataset (not shown here). In the optional arguments tab, we only specify accumulation by the “customer_analysis” Dataset columns “city_name” and “state_code”, as done with the evaluation function (not shown here). By executing this recipe, the results are rows of the customer ID numbers and their gender, as predicted by our decision tree model. A sample of this decision tree prediction analysis is shown in Figure 2.14.
Example 3
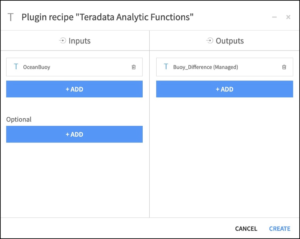
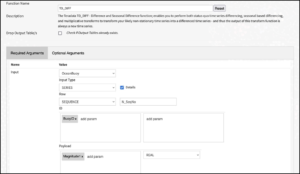
In this example, we illustrate an instance of using UAF time series analytic functions by using the TD_DIFF function for time series differencing. Assume a project flow with an input Dataset “OceanBuoy” that has a sequence of measurements for 2 different buoy magnitude variables. We would like to use the TD_DIFF function on the first of these magnitude variables. We begin by selecting the Teradata Analytic Functions recipe from the list of the Teradata plugin recipes.
In the pop-up window that follows up, specify the input and output Datasets; see Figure 2.15. The output Dataset will be stored in the database and schema corresponding to the connection selected in the Store Into field. Click on the CREATE button when done.
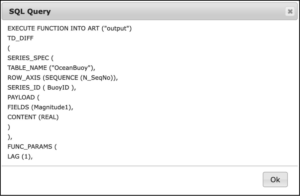
If you would like to inspect the resulting SQL query that the recipe will submit to the target server Analytics Database, then push the “Query” button on the upper part of the screen. In our example, this action produces a pop-up window as shown in Figure 2.17.
Usage notes
- The Analytic Functions recipe inputs and outputs can be only Datasets that represent tables on the connected Analytics Database.
- Analytic functions with multiple output Datasets typically require that you specify an output Dataset for the function’s output message/result, in addition to any other output tables/Datasets specified in the recipe. The output dataset(s) name(s) must match any name(s) specified within the recipe settings.
- For analytic functions that
- accept output table names as arguments, and
- produce only a message table that indicates the name of the output model/metrics table
you need to specify output Datasets with different names from those tables.
Some analytic functions provide an option to delete an already existing output table prior to executing an algorithm, but others do not. In the former case, the connected Analytics Database throws an “Already exists” exception.
- In the Analytic Functions recipe back-end, the plugin submits SQL queries to create output tables in the target Teradata Vantage system by using CREATE SET TABLE. That is, the function output is checked for duplicate rows. If any duplicate rows are found, then they are removed from the output table. The check for duplicate rows adds a slight performance burden compared to using unfiltered output. This behavior is not adjustable in the present version of the plugin.
3. In-Vantage Scripting recipe
The In-Vantage Scripting recipe enables you to interact with table operator objects within the Analytics Database, allowing for the execution of Python and R scripts seamlessly within the Teradata Vantage environment. Specifically, the In-Vantage Scripting recipe facilitates wrapper calls, with the specific functionality dependent on the type of connection, as follows:
- When connected to the VantageCloud Lake systems, users are provided with the APPLY Table Operator (ATO) object interface, coupled with the capabilities of the Open Analytics Framework (OAF). The Open Analytics Framework is a scalable and extensible framework for executing third-party open source and custom analytics. For more details, please
see: https://docs.teradata.com/r/Teradata-VantageCloud-Lake/Analyzing-Your-Data/Build-Scalable-Analytics-with-Open-Analytics-Framework/Introduction-to-Vantage-Open-Analytics/What-is-Open-Analytics-Framework - When connected to VantageCloud Enterprise or Vantage Core systems, users access the Analytics Database SCRIPT Table Operator (STO) object interface.
Table operators stream data from Analytics Database tables to the standard input of Python and R scripts and stream the scripts’ standard output back to the Analytics Database. To run your scripts in this setup, scripts need only be suitably adjusted to account for the Analytics Database data input/output streaming mode. In return, and as a result, script performance is enhanced via the Teradata Vantage architectural parallelism.
APPLY Table Operator
APPLY table operator is part of the Open Analytics Framework (OAF) on VantageCloud Lake systems. The Open Analytics Framework enables you to customize an isolated Python or R environment on a VantageCloud Lake compute cluster, and then upload your language scripts and associated files onto the user-specific environment. APPLY runs Python and R scripts in the environment you have set up on the connected system, provided the environment is owned by the Database user in your project’s connection. APPLY scales your Analytics by invoking and executing simultaneously instances of your script on containerized nodes in a VantageCloud Lake compute cluster.
To use the Open Analytics Framework features and the APPLY table operator object in a VantageCloud Lake system from within Dataiku, you must first ensure that:
- The system must include the analytic compute cluster component. In compute clusters, standard or analytic compute groups of one or more standard or analytic compute profiles, respectively, can be specified.
- At least one analytic compute group must be created on the system. This is achieved by creating a compute group with its query strategy argument specified as “Analytic“.
- Users must be given access privileges to the analytic compute group. Access is typically granted by your system administrator.
- Your session takes place in an analytic compute group you are a member of.
The last requirement can be satisfied either directly on the tenant, or through the Dataiku interface. In either scenario, it must be specified for your Database user of your Dataiku connection that your Database user session’s compute group is an existing analytic compute group. Let us assume an example where your Database user is member of the analytic compute group opaf_qa_group. The following statement must be provided either by you, or on your behalf by your system administrator:
SET SESSION COMPUTE GROUP group_name;
If your Teradata Vantage administrator has already specified the above statement for your Database user, then you can proceed to use the recipe.
Otherwise, you can set the session of VantageCloud Lake connection to the specific analytic compute group from your VantageCloud Lake connection page in Dataiku as follows (see Figure 3.1):
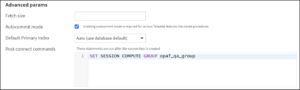
- On your connection page, go to the Advanced params area.
- In the Post-connect commands field, specify the statement:
SET SESSION COMPUTE GROUP group_name;
where group_name is the name of the analytic compute group you have access to on your target system.
If a suitable SET SESSION statement as above is not specified in the connection you use with the recipe, then the job will fail when you attempt to run the recipe. In more detail, you will encounter an error specifying that the compute group associated with your account is not analytic.
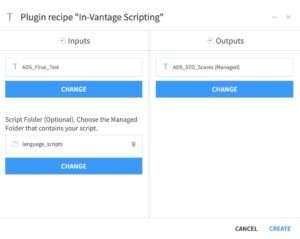
We examine how to use the In-Vantage Scripting recipe with the Open Analytics Framework and APPLY by means of a scoring use case. In particular, we assume the following set-up:
- You have a Dataiku project flow with a testing Dataset “ADS_Final_Test”, whose rows you can score with a Python model you have available in a binary file “ex1pModForDSS.out”, and a Python scoring script “ex1pScoViaDSS.py”. You keep both the model and the scoring script in a managed folder “ATO_Scripts” in your project.
- You have a Personal Access Token generated through the Cloud Control Pane (CCP) along with a private key in PEM format present in the managed folder “ATO_Scripts ” in your project.
- On the Teradata Vantage side, you are connected to a VantageCloud Lake system, and you are Analytics Database user “me”, for which you have suitable permissions. You further wish to create a Python environment “DataikuPlugin_Test” and store your scripts, associated files and required packages.
In your project flow select the In-Database Scripting recipe from the list of the Teradata plugin recipes. Upon creating the recipe, specify the input and output. Figure 3.2 shows the corresponding specifications for our use case example.
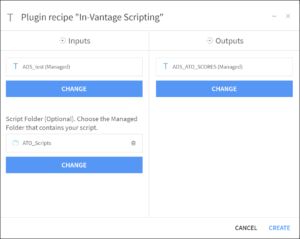
The recipe features 3 tabs with credentials used to authenticate the Open Analytics Framework, arguments used to create/remove an environment, install/replace the script files/ libraries in the environment and/or invoke the APPLY Table Operator (ATO). Each tab is presented in detail in the following sections.
Open Analytics Framework Authentication
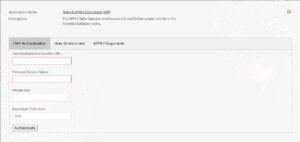
The OAF Authentication Tab serves as the gateway to initiate the authentication process seamlessly. It comprises of three mandatory fields designated as follows: “User Environment Service URL” where the UES URL is entered, “Personal Access Token” where the token is entered, and “Private Key” where a PEM-formatted key from the managed folder can be selected. Additionally, there is a fourth field, ‘Expiration Time,’ preset to 3600 seconds, equivalent to one hour; see Figure: 3.3.
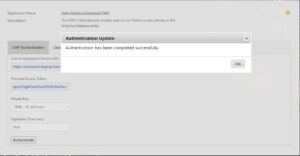
After filling in the necessary information, the ‘Authenticate’ button will become active. Simply click on it to initiate the process. This action validates the details entered, and authentication is completed internally by using the database credentials from the Dataiku connection page. The ‘Expiration Time’ input determines the lifespan of this authentication. If necessary, adjustments can be made to this field. Otherwise, the authentication remains valid for one hour by default, after which you will need to return to the OAF authentication tab to re-initiate the authentication process. Upon successful authentication, a confirmation popup will signal the completion of the process; see Figure: 3.4.
After the successful authentication, you will have access to create, remove, and manage user environments.
Note 1: Authentication is valid for one hour window by default. Past this time limit, you will need to re-authenticate to continue using the recipe.
Note 2: Assume you have successfully authenticated, and you attempt to re-authenticate within the time window that your former authentication is valid. You can re-authenticate multiple times, and your latest successful authentication will reset the authentication time window counter.
Note 3:
VantageCloud Lake personal access tokens (PAT) is used with the Open Analytics Framework. To create a PAT, you must have a public key in PEM format. You can generate that by following the steps outlined in the following documentation.
Note 4: The Open Analytics Framework credentials provide a different authentication from your Database user connection credentials. With the Open Analytics Framework authentication, you have the ability to create and modify user environments of other Database users that may be sharing the same Open Analytics Framework credentials with you. However, to run your scripts with the APPLY Table Operator within a specific Dataiku connection, the user environments specified in the APPLY calls must be owned by the Database user of this Dataiku connection.
User Environment
The ‘User Environment’ tab serves as a gateway to your remote environment. Within this tab, you will find subtabs with options to efficiently oversee and perform fundamental operations like creating, deleting, and customizing environments; see Figure: 3.6. In the following, we explore the functionality under each one of those 3 subtabs “Create”, “Manage”, and “Remove“.
Create
Use this tab to easily initiate an environment creation process. It comprises of three essential fields: ‘Base Environment,’ ‘Environment Name,’ and ‘Description‘.
- Base Environment:
- Select from the available ‘R’ and ‘Python’ Base Environments‘.
- To update the list of available base environments after completing the authentication process, simply click on ‘Click to refresh list‘.
- Environment Name:
- Specify a unique name for your user environment.
- Description:
- Optional argument that you can use to specify a brief description about your user environment.
Note: Once clicked, a drop-down menu button is unavailable to re-click. It shows as inactive until a different option is selected.
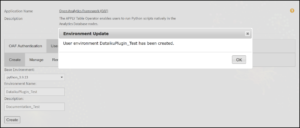
Once you have provided all the necessary information, simply click the ‘Create’ button to kickstart the process of generating a user environment. Upon successful completion, a pop-up message will confirm the successful creation of the environment; see Figure: 3.7.
Manage
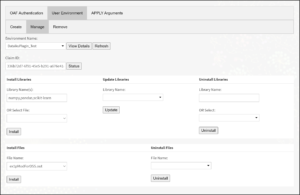
This tab empowers you to perform a variety of operations and delve into the user environment for exploration and management; see Figure: 3.8.
- Environment Name:
- Select the user environment name from the dropdown.
- To update the list of available environments after completing the authentication process, simply click on ‘Click to refresh list‘.
- View Details:
- Click on this button to view the details of the selected environment; namely, the environment name, base environment, description, installed files and libraries.
- Refresh:
- Click on this button to refresh the selected environment to reflect all the changes done (if any) outside the scope of Dataiku.
- Claim ID:
- Enter the claim ID which you can be prompted for during any of the install, update, or uninstall operations.
- Status:
- Click on this button to view the status of the specified claim id. By default, it lists all the active claims IDs if the ‘Claim ID’ field is left empty.
- Install Libraries:
- Enter the library name(s) in the python format or select the ‘requirements.txt’ file from the DSS Managed Folder. If both fields are provided, preference is given to the text field.
- Click on the ‘Install’ button and you will be prompted with a claim ID referring to the desired operation.
- Update Libraries:
- Select the library name you wish to update from the available libraries in the selected environment.
- After successfully completing the authentication and selecting the desired environment, you can refresh the list by clicking on ‘Click to refresh list‘.
- Click on the ‘Update’ button and you will be prompted with a claim ID referring to the desired operation.
- Select the library name you wish to update from the available libraries in the selected environment.
- Uninstall Libraries:
- Enter the library name(s) in the python format or select the desired library name from the dropdown.
- After successfully completing the authentication and selecting the desired environment, you can refresh the list by clicking on ‘Click to refresh list‘.
- Click on the ‘Uninstall’ button and a pop-up will confirm your intent as this operation is irreversible.
- After confirming, you will be prompted with a claim ID referring to the desired operation.
- Enter the library name(s) in the python format or select the desired library name from the dropdown.
- Install Files:
- Select the file from the Dataiku Managed Folder which you wish to upload on the select user environment.
- Click on the ‘Install’ button to upload the selected file to the desired user environment.
- If the file is less than 10 MB, you will get a prompt confirming that the file has been uploaded successfully.
- Else, you will be prompted with a claim ID referring to the desired operation.
- Uninstall Files
- Select the file you wish to remove from the user environment from the list.
- After successfully completing the authentication and selecting the desired environment, you can refresh the list by clicking on ‘Click to refresh list‘.
- Click on the ‘Uninstall’ button and a pop-up will confirm your intent as this operation is irreversible.
- After confirming, you will get a prompt confirming that the file has been removed successfully.
- Select the file you wish to remove from the user environment from the list.
Note: Once clicked, a drop-down menu button is unavailable to re-click. It shows as inactive until a different option is selected.
Remove
Use this tab to remove an environment effortlessly. It features a single mandatory field labeled ‘Environment Name‘.
- Environment Name:
- Select the user environment name from the dropdown.
- After successfully completing the authentication, you can refresh the list by clicking on ‘Click to refresh list‘.
Note: Once clicked, a drop-down menu button is unavailable to re-click. It shows as inactive until a different option is selected.
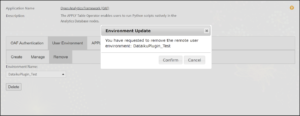
Upon entering all the necessary details, click on ‘Delete’ and this will trigger the operation to remove the specified user environment. Prior to proceeding, a pop-up will ask you to confirm your intent; see Figure: 3.9.
Note: Removing an environment in the Open Analytics Framework is an irreversible action. Ensure that you are certain prior to proceeding with an environment deletion.
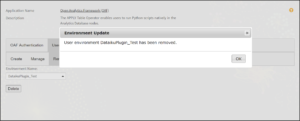
Following your confirmation, a pop-up message validates the specified environment has been successfully removed; see Figure: 3.10.
APPLY Arguments
Note: In the following, the recipe prevents using specific characters in some fields for security purposes as follows:
- When you specify column names in the input Dataset, the double quote ” (unicode character U+0022) cannot be used in the name string. You can otherwise use any character in the column naming specification, according to the related Vantage documentation at: https://docs.teradata.com/r/SQL-Fundamentals/July-2021/Basic-SQL-Syntax/Object-Names.
- The semicolon ; (unicode character U+003B) cannot be used in the Conditions field.
- Script Language
- Select whether you are submitting a Python or an R script.
- Environment Name
- Select the environment name from the drop-down.
- Click on ‘Click to refresh list’ after completing the authentication to see the available environments.
- This specifies the name of the environment that the APPLY_COMMAND will execute in.
- Script Name
- Select the script name from the drop-down.
- After successfully completing the authentication and selecting the desired environment, you can refresh the list by clicking on ‘Click to refresh list.’
- Delimiter
- Specify the delimiter to use from reading columns from a row and writing result columns.
- It must be a valid Unicode point.
- The default value is comma (,).
- Quotechar
- Specify the character used to quote all input and output values to the script.
- The default value is double quote (“).
- Using QUOTECHAR enables the database to distinguish between NULL values and empty VARCHARs. A VARCHAR with length zero is quoted, while NULL values are not.
- If the APPLY function finds a quote character in the data, the data escapes by a second quote character. For example:
He said, “Hey there!”
Default QUOTECHAR (‘”‘) becomes
“He said, “”Hey there!”””
- Script Arguments
- Optional arguments that your script may need for execution. Specify one argument per field and click on the + button to add argument fields.
- Script Input Columns
- Specify the column names of the recipe input dataset in the order needed by your script. Specify one column name per box, and click on the + button to add as many column names as you need. If you leave the filed blank and specify no names, then the script receives as input all columns in the input dataset.
- This field corresponds to the APPLY Table Operator ON clause.
- Optionally, use the Conditions field to specify any logical conditions for row selection across your script input columns. If specified, then conditions must be in SQL format. Multiple conditions should be separated by any of the AND and OR keywords. This field is reserved for the input to the optional WHERE clause in the SCRIPT Table Operator ON clause.
- Data Partition Option
- Select the default option None in the drop-down menu to have the SCRIPT input data treated as a single partition. Select any of the other options so that one or more columns of your input Dataset are designated as partition columns in the Column name(s) to partition by field.
- If you specify to partition By column values, then different partitions are determined by sets of rows with unique values (if one partition column is specified) or with unique value combinations (if multiple partition columns are specified) in the designated partition column(s). This option corresponds to the APPLY Table Operator PARTITION BY clause.
- If you specify to partition By Database AMP Hash, then data are distributed to Analytics Database AMPs based on AMP hash values contained in the designated partition column(s). This option corresponds to the APPLY Table Operator HASH BY clause.
- Column name(s) to partition by
- Specify one or more column names from the recipe input dataset to use for data partitioning according to the Data Partition Option menu choice. Specify one column name per box and click on the + button to add column names as desired.
- This option appears only when the Data Partition Option is other than None.
- Column name(s) to order by
- Specify one or more column names from the recipe input dataset to use their data for row ordering in the partitions. Specify one column name per box and click on the + button to add column names as desired.
- For each specified column, also specify the order sequencing in the neighboring drop-down menu. By default, columns are ordered in descending values order.
- This option appears only when the Data Partition Option is other than None.
- This option corresponds to the APPLY Table Operator ORDER BY clause (if data partitioning is by column values) or LOCAL ORDER BY clause (if data partitioning is by Database AMP hash).
- Null(s) Listing
- Specify the positioning of null values in the output.
- On selecting FIRST, NULL results are to be listed first.
- On selecting LAST, NULL results are to be listed at the end.
- By default, the value is set to ‘N/A.’
- This option appears only when the Data Partition Option is other than None.
- This option corresponds to the APPLY Table Operator ORDER BY clause (if data partitioning is by column values) or LOCAL ORDER BY clause (if data partitioning is by Database AMP hash).
- Script output variables
- In this section you must specify all output variables of your script. Each section row corresponds to one variable. Observe that you need to know the number and types of variables returned by your script. To this end, use the + button to add as many rows as needed. This specification corresponds to the APPLY Table Operator RETURNS clause. In particular, each row comprises of 2 columns with the following fields:
- In the first column, specify a name for a variable returned by the script.
- In the second column, specify the SQL data type of the corresponding variable. APPLY Table Operator will be storing your script output variables in an Analytics Database table, hence the requirement to specify SQL data types.
- Push the Select all variables button to include all of your script output variables in the recipe output dataset. This button is selected by default. This option corresponds to specifying SELECT * in an APPLY Table Operator query.
- Select the blank button to the right of the fields in a row to include the corresponding variable in the recipe output dataset. If any of those buttons is selected at any point, then the Select all variables button is deselected. This option enables you to select specific output variables of your script to be included in the recipe output dataset.
- It is equivalent to either have the Select all variables button selected or all individual output variable rows buttons selected.
- In this section you must specify all output variables of your script. Each section row corresponds to one variable. Observe that you need to know the number and types of variables returned by your script. To this end, use the + button to add as many rows as needed. This specification corresponds to the APPLY Table Operator RETURNS clause. In particular, each row comprises of 2 columns with the following fields:
Running the APPLY Recipe
SCRIPT Table Operator
To use the Analytics Database STO object from within Dataiku, you must first ensure you specify the custom property STO_DATABASE on your associated Teradata connection page; see Figure 3.13. Specifically:
- On your connection properties page go to the Custom Properties area, and push the + ADD PROPERTY button.
- In the Property name field, specify the keyword STO_DATABASE.
- In the Property value field, specify the database name where you want to upload your files to; in our use case example, this value is myDB.
You can further choose to keep this property secret by checking the nearby “Secret” button; in our use case example, we leave this button unchecked. Also, if you no longer need the property, then you can remove it by clicking on the red trash can icon button on the right-most end of the property row.
Finally, your user account for the target Analytics Database must have been granted specific privileges to use the STO, as detailed in the earlier section How to set up the plugin.

If the custom property STO_DATABASE is not specified in the connection you use with the recipe, then an error will occur when you attempt to specify the recipe settings; see the following section “Script Loading“.
Note for Dataiku servers with User Isolation mode (UIF) enabled:
Special provisions are needed to use the “In-Database Scripting” recipe in conjunction with VantageCloud Enterprise or Vantage Core servers, as follows.
– The recipe operates on the basis of a “one-to-one” identity mapping per the preconfigured Dataiku provisions described at https://doc.dataiku.com/dss/latest user-isolation/initial-setup.html. Therefore, it is assumed that Dataiku users also have a same-username Linux account with a home directory on the server.
– Behind the scenes, the recipe needs to temporarily carry files placed in a user project’s Managed folder to the user’s Linux account home directory.
Specifically, if <user> means the UNIX user which runs the DSS software, then this user’s home directory is most typically /home/<user>.
1- In a first step, the recipe will copy the specified files-to-upload to the target Vantage server from the user project’s Managed folder into a directory /home/<user>/teradata-plugin-tmp . The recipe will create this directory, if it does not formerly exist.
2- In a second step, the Teradata JDBC driver will read the specified files from the /home/<user>/teradata-plugin-tmp directory and upload them to the target Vantage server for use with the SCRIPT table operator.
For the above operations, minimal permissions must be assigned in advance from the Dataiku server administrator to the following directories in a <user>’s path:
• chmod 711 /home/<user>
• chmod 711 /home/<user>/teradata-plugin-tmp
These permissions grant traversing rights to users in the same group as <user> and third party users. The preceding UNIX syntax is equivalent to the alternative syntax g+x, o+x.
We examine how to use the In-Vantage Scripting recipe with SCRIPT by means of a scoring use case. In particular, we assume the following set-up:
- You have a Dataiku project flow with a testing Dataset “ADS_Final_Test”, whose rows you can score with a Python model you have available in a binary file “ex1pModForDSS.out”, and a Python scoring script “ex1pScoViaDSS.py”. You keep both the model and the scoring script in a managed folder “language_scripts” in your project.
- On the Teradata Vantage side, you are Analytics Database user “me”, and you wish to upload and store your scripts and associated files in database “myDB”, for which you have suitable permissions.
In your project flow select the In-Database Scripting recipe from the list of the Teradata plugin recipes. Upon creating the recipe, specify the input and output. Figure 3.14 shows the corresponding specifications for our use case example.
The recipe features 2 tabs with arguments used to install/replace the script files on the Analytics Database and/or invoke the SCRIPT Table Operator (STO). Each tab is presented in detail in the following sections.
Script loading
If you have omitted specifying the custom property STO_DATABASE in the associated Teradata connection, then the Script Loading tab will immediately present you with an error, as shown in Figure 3.15. Attempting to run the recipe while the error is showing will result in job failure.
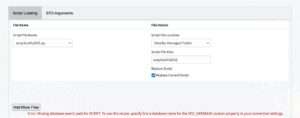
Assume you have otherwise specified the STO_DATABASE custom property in your connection. Then, the Script Loading tab screen displays in the bottom of the File Name and File Details section a relative (to your language script) path in the Analytics Database. This path designates the location where any file <filename> will be uploaded by the recipe onto every Analytics Database node; see Figure 3.16.
Note: If your script reads from any auxiliary file <filename> that you also upload to the Analytics Database, then you must adjust your script code by suitably specifying the <filename> location in the Analytics Database where needed, as shown in Figure 3.16. This adjustment should be made before the script is uploaded to the Analytics Database.
In our use case, for example, your Python script is expected to read the binary model file “ex1pModForDSS.out” after the 2 files have been uploaded into the Analytics Database. In the Analytics Database, the model file could be accessed by your code at the path shown in Figure 3.4, where the corresponding Python code could involve a file opening statement like:
fileIn = open('myDB/ex1pModForDSS.out', 'rb')
In this tab, you can specify the following arguments:
- Script File Location
- Start here to specify the current location of the language script to upload and install on the target Vantage server. The script must be loaded from a Dataiku Managed Folder.
- Script File Name
- This field appears after you select a script file location option. Specifies the name of the script file to be uploaded.
- This is the main script used in the SCRIPT Table Operator.
- Based on the Script File Location, this input form is as follows:
- The script is in Dataiku Managed Folders, therefore a drop-down box is provided that contains a list of the files in the respective location.
- Script File Alias
- The file name alias to be used in the SQL statement.
- This is mainly used by the SCRIPT Installation/Replace process in the metadata tables.
- Replace Script button
- If a file with the same name already exists at the destination location, then selecting the button specifies to replace the file. Otherwise, the replacement request is ignored.
- Specify to replace an existing script on the Analytics Database when you would like to upload an updated version of the script.
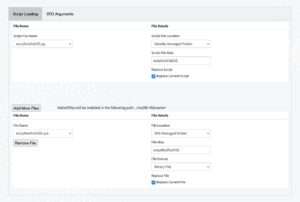
- Add More Files
- This button enables you to have one or more additional auxiliary files (e.g., model files) installed in the Analytics Database for use by the script. Push the button once for every additional file you would like to specify.
- Additional Files:
- File Location
- The current location of the file to be installed; this is a Dataiku Managed Folder.
- File Name
- This is the file name of an additional file.
- Similar to the Script File Name above, this input option is a drop-down box (since DSS Managed Folder is selected as the File Location).
- File Format
- Specifies whether the additional file to be installed is a BINARY or TEXT file.
- Replace Current File
- Similar to the Replace Script above, selecting this button specifies to replace an existing file with the same name in the destination Analytics Database.
- File Location
Note 1: Make any necessary script adjustments before you run the recipe, so that a suitable script version is uploaded.
Note 2: If you should need to modify an uploaded version of your script and/or auxiliary files, then you need to make the changes in a copy of the file(s) on your client, and then run the recipe again by uploading the updated file(s) to replace the existing one(s).
SCRIPT arguments
Note: In the following, the recipe prevents using specific characters in some fields for security purposes as follows:
- When you specify column names in the input Dataset, the double quote ” (unicode character U+0022) cannot be used in the name string. You can otherwise use any character in the column naming specification, according to the related Vantage documentation at: https://docs.teradata.com/r/SQL-Fundamentals/July-2021/Basic-SQL-Syntax/Object-Names
- The semicolon ; (unicode character U+003B) cannot be used in the Conditions field.
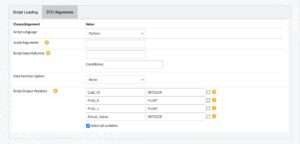
Figure 3.17 shows the recipe screen under the “SCRIPT Arguments” tab. The fields on this screen are described in the following.

Figure 3.17: Arguments to invoke the SCRIPT Database object. - Script Language
- Select whether you are submitting a Python or an R script.
- Script Arguments
- Optional arguments that your script may need for execution. Specify one argument per field, and click on the + button to add argument fields.
- Script Input Columns
- Specify the column names of the recipe input dataset in the order needed by your script. Specify one column name per box, and click on the + button to add as many column names as you need. If you leave the filed blank and specify no names, then the script receives as input all columns in the input dataset.
- This field corresponds to the SCRIPT Table Operator ON clause.
- Optionally, use the Conditions field to specify any logical conditions for row selection across your script input columns. If specified, then conditions must be in SQL format. Multiple conditions should be separated by any of the AND and OR keywords. This field is reserved for the input to the optional WHERE clause in the SCRIPT Table Operator ON clause.
- Data Partition Option
- Select the default option None in the drop-down menu to have the SCRIPT input data treated as a single partition. Select any of the other options so that one or more columns of your input Dataset are designated as partition columns in the Column name(s) to partition by field.
- If you specify to partition By column values, then different partitions are determined by sets of rows with unique values (if one partition column is specified) or with unique value combinations (if multiple partition columns are specified) in the designated partition column(s). This option corresponds to the SCRIPT Table Operator PARTITION BY clause.
- If you specify to partition By Database AMP Hash, then data are distributed to Analytics Database AMPs based on AMP hash values contained in the designated partition column(s). This option corresponds to the SCRIPT Table Operator HASH BY clause.
- Column name(s) to partition by
- Specify one or more column names from the recipe input dataset to use for data partitioning according to the Data Partition Option menu choice. Specify one column name per box, and click on the + button to add column names as desired.
- This option appears only when the Data Partition Option is other than None.
- Column name(s) to order by
- Specify one or more column names from the recipe input dataset to use their data for row ordering in the partitions. Specify one column name per box, and click on the + button to add column names as desired.
- For each specified column, also specify the order sequencing in the neighboring drop-down menu. By default, columns are ordered in descending values order.
- This option appears only when the Data Partition Option is other than None.
- This option corresponds to the SCRIPT Table Operator ORDER BY clause (if data partitioning is by column values) or LOCAL ORDER BY clause (if data partitioning is by Database AMP hash).
- Script output variables
- In this section you must specify all output variables of your script. Each section row corresponds to one variable. Observe that you need to know the number and types of variables returned by your script. To this end, use the + button to add as many rows as needed. This specification corresponds to the SCRIPT Table Operator RETURNS clause. In particular, each row comprises of 2 columns with the following fields:
- In the first column, specify a name for a variable returned by the script.
- In the second column, specify the SQL data type of the corresponding variable. SCRIPT Table Operator will be storing your script output variables in an Analytics Database table, hence the requirement to specify SQL data types.
- Push the Select all variables button to include all of your script output variables in the recipe output dataset. This button is selected by default. This option corresponds to specifying SELECT * in a SCRIPT Table Operator query.
- Select the blank button to the right of the fields in a row to include the corresponding variable in the recipe output dataset. If any of those buttons is selected at any point, then the Select all variables button is deselected. This option enables you to select specific output variables of your script to be included in the recipe output dataset.
- It is equivalent to either have the Select all variables button selected or all individual output variable rows buttons selected.
- In this section you must specify all output variables of your script. Each section row corresponds to one variable. Observe that you need to know the number and types of variables returned by your script. To this end, use the + button to add as many rows as needed. This specification corresponds to the SCRIPT Table Operator RETURNS clause. In particular, each row comprises of 2 columns with the following fields:
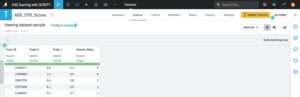
Running the SCRIPT recipe
Upon setting up the arguments and running the recipe, the output Dataset is populated with data from the Analytics Database table with the scoring results, as was specified in the recipe outputs; see Figure 3.18.
4. BYOM recipes
-
trained and deployed with a visual recipe, or
- previously stored within a file
and you would like to use this model for performant scoring in the Teradata Vantage Analytics Database. The plugin’s bring-your-own-model (BYOM) recipes address both these use cases easily and effectively; in particular:
- The “Model Export to Vantage” recipe helps you BYOM from Dataiku to Teradata Vantage by exporting your models to a target Teradata Vantage server. Supported model formats are PMML, ONNX, native Dataiku, and H2O MOJO models.
- The “BYOM Scoring” recipe enables you remote in-Database scoring with models already stored in Teradata Vantage tables. This recipe interfaces the BYOM Analytics Database software that supports scoring with models in the PMML, ONNX, native Dataiku, and H2O MOJO formats.
Model export to Vantage
The recipe takes as input
- deployed Dataiku models that have been saved in PMML or native Dataiku formats, or
- files with PMML, ONNX, native Dataiku, or H2O MOJO models stored in a managed folder.
The recipe exports the specified model to a Teradata Vantage server by saving it into a table on your target Analytics Database. Upon creating the recipe, you specify the destination table and an identifying name for your model. When export is complete, the recipe produces a dummy Dataset that logs the operation. The following paragraphs provide is a closer look into these steps.
Note: After upgrading to Teradata plugin v.3.0, pre-existing model export flows that were created with previous versions of the plugin might fail. If you should experience this behavior, then respecify (or retrain, if applicable) the model you wish to export from within the “Input/Output” tab on the top right side of the recipe screen; then save and run the recipe again.
Example: Saving a Dataiku model in PMML format
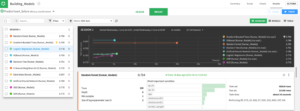
Click on the Visual Analyses button on the left side of the Dataiku banner. Select the analyses you have created, and then choose the model you would like to use further in Teradata Vantage. Assume the model you want to save is the Random Forest model that tops the list shown in Figure 4.1.
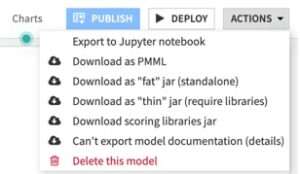
On the model screen, click on the top right the Deploy button; see Figure 4.2. Select the Download as PMML option to see the model saved in that format in your project flow.
Note: The option to save a model in PMML format might be unavailable for some models.
Selecting the recipe Input/Output
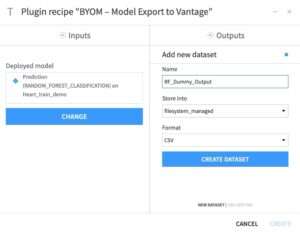
Back in your project flow, select the BYOM – Model Export to Vantage recipe from the list of the Teradata plugin recipes. A pop-up window will then ask you about the recipe input and output; see Figure 4.3. In the input section, specify the model you wish to export to Teradata Vantage. The recipe can pick its input either from the output of a deployment flow element, or from a managed folder that contains the model. In the output section, specify a name for the output Dataset. The recipe output is purely a dummy dataset with a string that reports success or failure information about the recipe run.
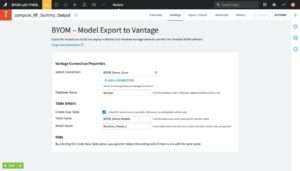
Once you create the recipe, you are taken to the recipe main screen; see Figure 4.4. On this screen, you specify information about the target Teradata Vantage server you want to send the plugin to, and the table to save the model in. In more detail:
Select an export format
In the Export Model As field, click on the drop-down menu to select the model format; the PMML, H2O MOJO, Dataiku, and ONNX options are available.
Target Teradata Vantage server connection properties
In the Select Connection field, click the + ADD A CONNECTION button, and a drop-down menu appears with the existing list of Dataiku connections. Choose your target Teradata Vantage server connection from this list. To drop this choice and select a different connection, push the red trashcan icon on the far-right end of a selected connection’s field; then choose a different connection by clicking again the + ADD A CONNECTION button.
Note 1: The + ADD A CONNECTION button can be pushed multiple times, and multiple connections can be specified. Any connections added below your first choice are ignored, and can be removed from the screen with their corresponding red trashcan icon.
Note 2: If you specify no connection through the + ADD A CONNECTION button and proceed to run the recipe, then an error will occur.
In the Database Name field, specify the database name where you would like to store the models table in on the target Teradata Vantage server. If you leave the field blank, then the connection’s default database will be used.
Note 3: Your Database user account in the target connection must have permissions to create, modify and drop tables in the database you decide to store the model table in.
Model table details
Subsequently, in the Table Details lower section of the screen you can specify the Teradata Vantage table name where you wish to save the model in, and a name for your model so you can identify it among others in the table. For an example, see the bottom part in Figure 4.4.
Note 1: When saving the model, you can specify that a new table is created by clicking on the corresponding CREATE NEW TABLE button on the screen, or use an existing table on the Vantage server. If you specify to create a new table and the table name already exists, then the old table will be overwritten.
Note 2: The model name must be up to 30 characters long. Characters in excess are ignored.
Running the BYOM model export recipe
Upon setting up the arguments and running the recipe, the specified PMML-formatted model is exported into the target Teradata Vantage table. At the same time, a successful execution message is written in the recipe output dataset. Figure 4.5 shows the output of the recipe execution based on the export-to-Vantage task that was set up in Figure 4.4. The model_id referred to in the output message is the column name that contains the model name in the target models table.
Using an exported model on the target Teradata Vantage server
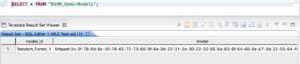
After storing it in a Teradata Vantage table, the PMML model can be accessed and used for any suitable operation. As an example, we illustrate querying the target table with SQL. Figure 4.6 shows a screenshot from a SQL editor with the query results. Observe that the same table hosts different models in multiple rows, and models can be of different formats. The model you stored can be identified by its name in the table column model_id.
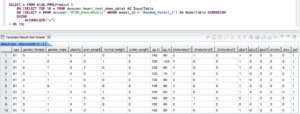
Further in this example, Figure 4.7 illustrates using a SQL query to invoke the model through the Advanced SQL Engine PMMLPredict function. PMMLPredict is a function in the Teradata Vantage BYOM software package. For details about the different functions syntax and query options, see the Teradata documentation page:
https://docs.teradata.com/r/Enterprise_IntelliFlex_Lake_VMware/Teradata-VantageTM-Bring-Your-Own-Model-User-Guide/BYOM-Functions.
In the following section, we illustrate how to score with models stored in Analytics Database tables directly from the Dataiku environment without any SQL programming. This operation is enabled by the BYOM Scoring recipe in the Teradata plugin.
BYOM scoring
This recipe enables you to perform scaled, fast scoring in-Database against table data in the Analytics Database where you have imported one or more models. As in the Model Export to Vantage recipe, the model source table and model names you wish to use must be specified inside the recipe after you create it. The following paragraphs have the detailed steps. We illustrate the steps by assuming a use case of consuming a saved Dataiku model that you previously exported to the same Teradata Vantage system in PMML format.
Example: Scoring In-database with a PMML-formatted model
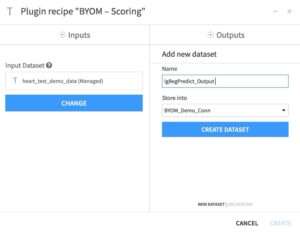
In your project flow, select the BYOM – Scoring recipe from the list of the Teradata plugin recipes. A pop-up window will then ask you about the recipe input and output; see Figure 4.8. In the input section, specify the test input Dataset to score. In the output section, specify a name for the output Dataset with the scored data.
The recipe then takes you to its main screen to specify parameters for the task. Figure 4.9 shows this screen with suitable specifications for our Dataiku model consumption use case. In the following, we step through the different fields in detail.
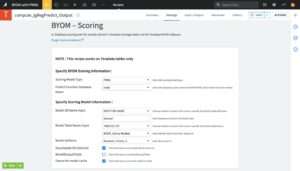
BYOM scoring information
The upper part of the screen is titled Specify BYOM Scoring Information, and prompts you to select the type and sub-types, if appropriate, of the scoring model you wish to use.
The first field is the Scoring Model Type. You can choose among the options of PMML, H2O MOJO, ONNX, and a JAR scoring lib; the latter is the native Dataiku model format.
Note for H2O MOJO models: If you select the H2O MOJO option as the scoring model type, then an additional field H2O Model Type shows up. You can choose between the options
- OPENSOURCE, and
- DAI (Driverless AI)
Furthermore, if you have an H2O DAI model to use, then you are required to specify the associated license information too. In this scenario, the additional couple of fields H2O DIA License DB Input, and H2O DIA License DB Table Input appear in the lower part of the screen (see next subsection), in which you need to specify the database and table names where your H2O DIA model license resides on the connected server.
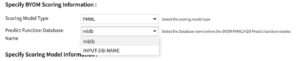
After the model type has been selected, the last field in the upper part of the screen is the Predict Function Database Name. In this field, you specify the database name in the Vantage server where the prediction function resides. The default installation location for the BYOM software inside an Analytics Database is a user database called mldb. If unsure, first validate this information with your Teradata Vantage Database Administrator. If applicable, choose the option INPUT-DB-NAME from the drop-down menu of this field to specify a different database name, as shown in Figure 4.10.
Specify Scoring Model Information
The lower screen section is titled Specify Scoring Model Information, and the recipe asks you to
- pinpoint the model you wish to use for the scoring task on the Teradata Vantage system where the input dataset table is located, and
- specify additional options
Sequentially, the section presents you with the following fields:
Model DB Name Input: Use the drop-down menu to select how to specify the database where your model table resides. You can either opt for
- the “DATABASE LIST”, where you are provided with a new drop-down menu to select the database from a list of available databases on the connected server, or
- the “INPUT-DB-NAME”, where you will be provided an empty field to specify explicitly the database name.
Example: In the illustration of Figure 4.9, the database name dataiku-test was selected from the database list drop-down menu.
Model Table Name Input: Use the drop-down menu to select how to specify the table that contains the model you wish to use. You can either opt for
- the “TABLES-LIST”, where you are provided with a new drop-down menu to select the target table from a list of available tables in the previously selected database, or
- the “INPUT-TABLE-NAME”, where you will be provided an empty field to specify explicitly the target table name.
Example: In the illustration of Figure 4.9, we opted for the INPUT-TABLE-NAME option, and specified explicitly the table Models-Table to use in the analysis.
Model Id/Name: Use the drop-down menu to choose the model you wish to use among the available models in the previously selected table. Models are named on the basis of their model ID.
Example: In the illustration of Figure 4.9, we located the desired model with model ID Cardio_RF_Model by inspecting the drop-down menu next to the Model Id/Name field.
As indicated in the previous subsection, if you specified your model to be of type H2O DAI, then you will be seeing a couple more fields at this point, as follows:
H2O DIA License DB Input: Use the drop-down menu to select how to specify the database where your model license information resides. You can either opt for
- the “LICENSE-DATABASE-LIST”, where you are provided with a new drop-down menu to select the database from a list of available databases on the server, or
- the “INPUT-LICENSE-DB-NAME”, where you will be provided an empty field to specify explicitly the database name.
H2O DIA License Table Input: Use the drop-down menu to select how to specify the table that contains your H2O DIA model license. You can either opt for
- the “LICENSE-TABLES-LIST”, where you are provided with a new drop-down menu to select the target table from a list of available tables in the previously selected database, or
- the “INPUT-LICENSE-TABLE-NAME”, where you will be provided an empty field to specify explicitly the target table name.
The remaining settings on the recipe screen enable specification of syntax elements of the Analytics Database BYOM prediction function that are supported by the recipe, as follows:
The Accumulate options specify to show all or a desired number of columns of the test table in the recipe’s output table. The recipe enables you to
- accumulate all columns by pushing the corresponding Accumulate All Columns button, or
- accumulate specific columns, by pushing one or more times the Add A Column button. Each time you push the button, a drop-down list of the test table column names appears so you can specify the columns to accumulate by. To discard a column choice, push the red trashcan icon on the far-right end of the field that contains the column name.
Note 1: When you select the Accumulate All Columns check box, then the Accumulate Specific Columns field is hidden.
Note 2: When you specify to use the Accumulate Specific Columns option but fail to specify any column names, then an error is produced.
The ModelOutputFields check box enables you to optionally specify the scoring fields to output as individual columns.
The Overwrite model cache check box enables you to activate the OverwriteCachedMode option of the Analytics Database BYOM prediction function. This option specifies any model left in cache be cleared. It is typically used when you update a model, so that the newer model version is used instead of the cached.
For further details about these syntax elements, see the Analytics Database BYOM prediction functions Syntax Elements sections at the Teradata documentation address:
https://docs.teradata.com/r/Enterprise_IntelliFlex_Lake_VMware/Teradata-VantageTM-Bring-Your-Own-Model-User-Guide/BYOM-Functions.
Running the BYOM Scoring Recipe
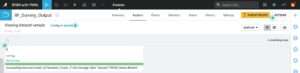
Upon setting up the arguments and running the recipe, a corresponding query is formed in the recipe back-end and pushed to the connected Analytics Database for execution. Figure 4.11 shows the scoring results output Dataset in our Dataiku model consumption use case.
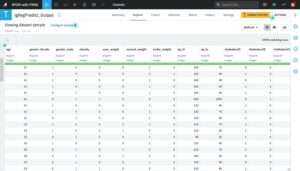
This operation in Dataiku is equivalent to submitting the explicit SQL query that was illustrated in the earlier Section “Using an Exported Model on the Target Vantage Server“.
Note: Since the BYOM scoring recipe only provides a wrapper for the corresponding Analytics Database BYOM prediction function, errors that might occur while using the recipe should be cross-checked with the function documentation on the BYOM page at the aforementioned web address in the previous section.
5. Troubleshooting
“External Code Failed” Error
Assume that upon attempting to load one of the plugin recipes, you encounter an error immediately after the plugin user interface screen appears. In this scenario, a small, red-framed window appears on the plugin screen with the error message “External code failed”, and the actual error message might vary; see Figure 5.1 for an instance.

A typical reason for this error can be a change that might have taken place in the Teradata plugin registered on your Dataiku server. A possible fix is to attempt reloading all plugins as follows:
- Go to the Applications button on the right side of the Dataiku top banner and select the Plugins page. Once on the page, select the Installed tab on the top of the screen.
- Push the RELOAD ALL button on the top right corner of the screen.
- Return to your project flow, refresh the page, and attempt to create the recipe anew.
My Teradata recipes do not work
The Teradata plugin recipes are not backwards-compatible with older deprecated counterparts featured in releases of individual Teradata plugins prior to v.2.0.0. If your project contains any of the deprecated recipes from the older, individual Teradata plugins (that is, the former Teradata SQLE Functions Plugin, Teradata SCRIPT Table Operator Plugin, or the Teradata BYOM plugin), and your server has been updated with the Teradata plugin v.2.0.0 or newer, then you will need to explicitly replace each one of those recipes with its corresponding counterpart in the Teradata plugin.
The BYOM Model Export to Vantage recipe fails with an error
Assume you have made the correct specifications in the “BYOM – Model Export to Vantage” recipe, and the recipe fails to execute successfully when you attempt to export a PMML-formatted model. If the error is unrelated to something that might be wrong with the Analytics Database or your connection settings, consider the following additional element to troubleshoot. The recipe requires that the recipe input Dataiku model can be in one of the PMML, ONNX, or native Dataiku formats. It might happen that for whatever reason the target model might have prior restrictions or limitations by Dataiku in being saved in a PMML-formatted object. In this scenario, the recipe cannot use this model, and will fail to run successfully if you invoke it with this input. You can inspect for any restrictions or limitations in saving a Dataiku model in PMML format by going to your project flow, and then selecting and opening the Dataiku model icon that contains the target model. Then click on the model active version title, and in the resulting screen inspect the options under the “Actions” button. The “Download as PMML” option should be available, otherwise the BYOM recipe will be unable to export this model to Vantage.
As a workaround for this scenario, you can feed your model as input to the BYOM Model Export recipe and attempt exporting the model in the native Dataiku format, instead.
The BYOM Scoring recipe fails with a SQL syntax error
Assume you have completed specifications in the “BYOM – Scoring” recipe, and when running the recipe fails with a syntax error about the SQL query submitted by the recipe in the background. A possible cause for this error may be the wrong specification in the recipe of the BYOM software installation database name on your connected Vantage server. This can be a likely error in different cases, such as when
- you might be using the recipe of a project that may have been originally set up for a different Vantage server.
- you might have no knowledge about the database name where the BYOM functions are installed on your connected Vantage server.
- there may have been a change in the installation location of the BYOM software on the target Vantage server.
In any scenario, first verify with your Vantage administrator the installation location of the BYOM software on that server. For example, in default BYOM installations the predictive functions are placed in a database named “mldb”. This database name appears by default in the settings of a new “BYOM – Scoring” recipe instance. However, a different specification may apply in your case, if the predictive functions are stored in a database with a name different from “mldb” on your connected server. Once you have the correct information, specify it in the “Predict Function Database Name” field(s) of your recipe, and retry running the recipe.
The OAF Authentication Fails with the error
Assume while working with the In-Vantage Scripting recipe (ATO), you encounter an error when attempting to manage the user environment or perform any OAF related operation, as illustrated in Figure 5.2.
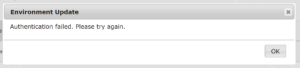
A common cause for this error may be incomplete or expired authentication, or it might occur due to inactivity for more than 2 minutes while filling in your credentials. In this scenario, follow these steps:
- Navigate to the In-Vantage Scripting recipe.
- Access the ‘OAF Authentication’ tab.
- Complete the authentication process.
If the problem persists, even after successful authentication, it could be attributed to a backend system issue. We recommend waiting for some time and then attempting the operation again. If the issue continues, please consider reaching out to your system administrator for further assistance.
The drop-down in User Environment Tab/APPLY Arguments Tab does not refresh
Assume while working with the In-Vantage Scripting recipe (ATO), you encounter an error when attempting to access any of the dropdowns; see figure 5.3.
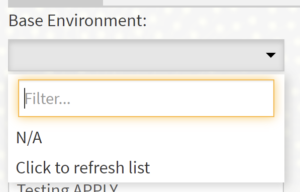
A common cause for this error may be incomplete or expired authentication. In this scenario, follow these steps:
- Navigate to the In-Vantage Scripting recipe.
- Access the ‘OAF Authentication’ tab.
- Complete the authentication process.
The interface of the In-Vantage Scripting recipe with Open Analytics Framework is not showing despite being connected to Vantage Cloud Lake
- Go to the connection page.
- Locate your specific connection.
- Initiate a connection test to verify its status.
The BYOM Model Export fails
It is likely that after upgrading to the Teradata plugin v.3.0, you might experience failure in pre-existing flows of the BYOM Model Export to Vantage recipe that were created with previous versions of the plugin. To resolve this issue, please follow these steps:
- Go into the BYOM Model Export recipe that manifests the issue.
- Select the “Input/Output” tab on the top right side of the recipe screen.
- Respecify (or retrain, if applicable) the input model shown on the left side of the screen.
- Save and try running the recipe again.
Plugin support policy
For any issues, support, remarks, comments, or suggestions about the plugin, please visit the Teradata Support website at https://support.teradata.com. Expected response time is typically one business day.