


Plugin information
| Version | 1.2.0 |
|---|---|
| Author | Dataiku (Alex Bourret) |
| Released | 2020-03-16 |
| Last updated | 2025-12-18 |
| License | Apache Software License |
| Source code | Github |
| Reporting issues | Github |
How to set up
Note
This plugin is intended to be used with SharePoint Online only. For the other SharePoint Server editions (2013, 2016, 2019), please refer to the unsupported plugin which can be found here.
Option 1: using your SharePoint login
This option is currently being deprecated by Microsoft. Please refer to Option 5 for replacement
Limitations
This authentication method cannot be used if your account is set up with MFA or if it belongs to a federated space name.
You can find out whether or not this is the case by going to this URL (after editing it with your SharePoint account email address): https://login.microsoftonline.com/[email protected]. The key NameSpaceType should read Managed. If it is Federated, you will need to use “Azure Single Sign On” or “Site App Token” instead.
Set up
- Find the tenant and site name of the SharePoint you want to sync with Dataiku.
Find your SharePoint tenant and site name from the URL - In Dataiku, go to Plugins > Installed > SharePoint > Settings > SharePoint login. There, fill in the details of the SharePoint instance you are trying to sync with Dataiku.
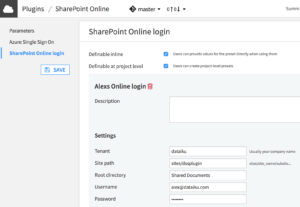
Add a plugin preset
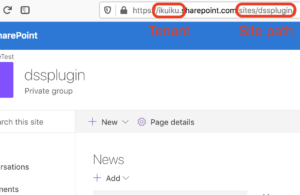
Say a typical URL for the files you want to give access to is https://dataiku.sharepoint.com/sites/rnd/plugins/Shared%20Documents/safe/list.xlsx
- Tenant is the sub domain prior to sharepoint.com, here
dataiku. If your company is using a custom address to access their SharePoint Online, then tenant will be the whole domain name preceded byhttps://, so for instancehttps://my-corp.com. - Site path is the path to the SharePoint site or sub-site you want to give access to. In this example it would be
sites/rnd/plugins - Root directory is the path to the highest level directory you want your Dataiku users to have access to. In the current example,
Shared Documents/safewill let the user browse any files and folders in the sub-directorysafe. Default value for Root directory isShared Documents, but it can also be left blank, in which case the user can access all the document libraries of thernd/pluginssite.
Option 2 : using Azure Single Sign On
- From the Azure Portal, go to Microsoft Entra ID > +Add App registrations create a new App (New registration). Set a name and a redirect URI pointing back to your Dataiku instance. It should follow this structure:
https://<<your Dataiku instance domain>>:<<your Dataiku instance port>>/dip/api/oauth2-callback. Unless your Dataiku instance is on a localhost, the URI has to point to a https secured server.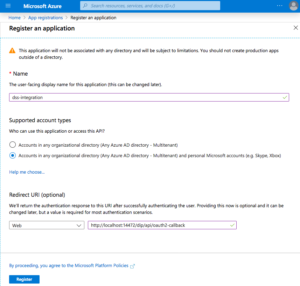
Create a new App in Azure Portal - Click on the newly created app. Copy the Application ID. Then go to the Certificates & secrets > New client secret tab. Set a description, choose an expire date, and copy the value of the created secret.
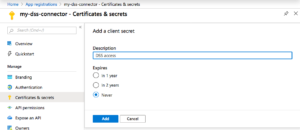
Add a client secret to the app - Then navigate to the API permissions tab and add the following delegated permissions: User.Read, AllSites.manage, AllSites.Read, AllSites.Write, MyFiles.Read and MyFiles.Write.
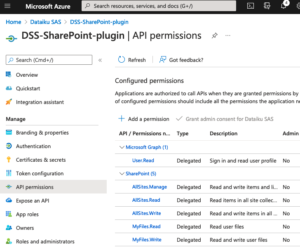
Add permissions to the app - In Dataiku, go to Plugins > Installed > SharePoint > Settings > Azure Single Sign On. There, set paste the App ID and App secret copied from step 1. The authorization endpoint should be
https://login.microsoftonline.com/common/oauth2/authorize?resource=https://<<Your Tenant>>.sharepoint.com(make sure to set the appropriate tenant)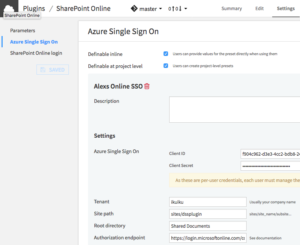
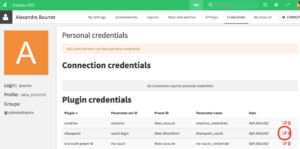
Add a plugin preset - Finally, each Dataiku user who needs access to SharePoint Online will have to go to Profile & settings > Credentials from their account. Click the edit button for the SharePoint preset you are configuring. This will redirect you to a Microsoft Single Sign On page. Log in to the account if necessary click Yes
Trigger the credential request
Option 3 : using Site App token
An application token can be created to give Dataiku an access to a given SharePoint site path. Note that only a tenant administrator of the SharePoint site can create this token.
- Register an app with your SharePoint site by going to site’s URL followed by
/_layouts/15/appregnew.aspx. The whole URL should look like this:https://{your tenant name}.sharepoint.com/{your site path}/_layouts/15/appregnew.aspx. Pick a name, generate the client ID and secret and copy them. Setlocalhostas App Domain, andhttps://localhostas redirect URL. - Next you will have to give the token the proper access rights. Go to your site’s URL followed by
_layouts/15/appinv.aspx. The URL should look like this:https://{your tenant name}.sharepoint.com/{your site path}/_layouts/15/appinv.aspx. - Enter the client ID created at the first step and press Lookup
- In the Permission Request XML box, copy and past this:
<AppPermissionRequests AllowAppOnlyPolicy="true"><AppPermissionRequest Scope="http://sharepoint/content/tenant" Right="FullControl" /></AppPermissionRequests>. More details about rights can be found on SharePoint’s documentation. - Finally, press Create and OK
- Find your tenant ID. To do this, click on Cog > Site settings > Site collection app permissions. There you should see the App you created in the first step. The App Identifier contains two alphanumerical strings separated by a
@symbol. The string left of the @ is your app ID. The string right of the @ is your tenant ID. Copy it. - In Dataiku, go to App > Plugins > Installed > SharePoint Online > SharePoint Online Site App Permissions. Create a new preset, and paste the tenant name, client secret, client ID and tenant ID. This preset will now be usable by using Site App Permissions as type of authentication.
Option 4 : using client side certificate
- Get your certificate and private key ready. If you don’t already have one, you can create for instance using openssl :
openssl req -newkey rsa:2048 -new -nodes -x509 -days 3650 -keyout private_key.pem -out certificate.pem - From the Azure Portal, go to Microsoft Entra ID > +Add App registrations create a new App.
- Click on the newly created app. Copy the Application ID and tenant ID. Then go to the Certificates & secrets > Certificates tab. Upload your certificate (or
certificate.pemcreated from the first step 1). Copy the certificate’s thumbprint.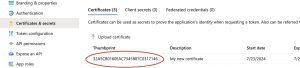
Copy the certificate’s thumprint - Then navigate to the API permissions tab and add the appropriate permissions.
- In Dataiku, go to Plugins > Installed > SharePoint Online > Settings > Certificates. There, set paste the App ID, Tenant ID and certificate’s thumbprint copied from step 3.
- Open the private key file (or
private_key.pemcreated at step 1) in a text application and copy /paste its content into theClient certificate (private key)section of the preset. The section to copy starts and ends with-----BEGIN PRIVATE KEY-----/-----END PRIVATE KEY-----or-----BEGIN ENCRYPTED PRIVATE KEY-----/-----END ENCRYPTED PRIVATE KEY----- - The preset will now be usable by selecting Certificates as type of authentication.
Option 5: App username and password
- From the Azure Portal, go to Microsoft Entra ID > +Add App registrations create a new App (New registration).
- Click on the newly created app. Copy the Tenant ID and Application ID for later use.
- Navigate to the Authentication tab. In the Advanced settings, allow public client flow
- Then navigate to the API permissions tab and add the following delegated permissions: User.Read, AllSites.manage, AllSites.Read, AllSites.Write, MyFiles.Read and MyFiles.Write.
- In Dataiku, go to Plugins > Installed > SharePoint > Settings > App username password. There, set paste the Tenant ID and App ID copied from step 1. Set your username password in the preset.
- To use the preset, select the Username / password type of authentication, then the preset you just created.
How to use
- In your Dataiku project flow, select Dataset > SharePoint
- Click Shared Documents or Lists, according to the data source you are trying to sync Dataiku to.
- Pick the authentication type and the preset, and browse to the document or folder you want to use as dataset.
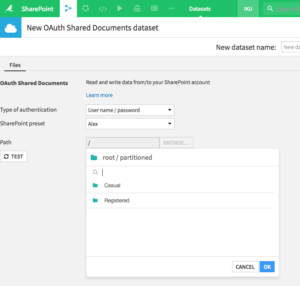
Browse to the dataset path - For Azure Single Sign On presets, the Dataiku users can access other SharePoint sites they have access rights to. For this, select Show advanced parameters and set the site path and/or root path in Site path preset overwrite / Root directory preset overwrite
- If the source is a list,
- you will have know its name beforehand.
- although all the column names will be visible, only these selected in the SharePoint’s list standard view will be populated with data.
If necessary, another list view can be selected:
- First, find the name of the view for which the required columns are visible
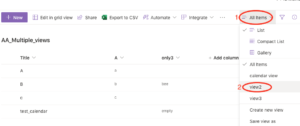
Find the Sharepoint view name - In your Dataiku list dataset, tick Show advanced parameters, and write the name of the view in the View name section
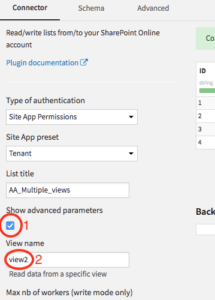
Select the SharePoint list view in Dataiku
Export data back to SharePoint Online
As a document
- On your SharePoint Online, create a destination directory
- On your Dataiku project flow, create a SharePoint folder by pressing Dataset > Folder and then select the SharePoint Server Shared Documents plugin as the Store into parameter
- You will get a red error box at this stage. To resolve the error, go to the Settings tab and set the correct type of authentication and connection. Once this is done, type “/” in the path window and press Browse. Navigate to the destination directory created on step 1 and press OK. It is important that the destination directory is created for the sole use of your Dataiku project. Being a managed folder, its content could be deleted. For instance, with the parameters as shown below, removing the folder from the flow with the drop data option selected will result in the actual “dss” SharePoint directory being deleted as well.
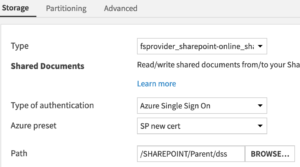
The last directory in the path should be used by your Dataiku project only - In your Dataiku flow, pick the dataset you want to export back to SharePoint, and select the Export to folder recipe. In the Export Recipe window, click on Use existing and pick the folder you created in steps 2-3. You can change the file format to you liking.
- Save and Run, and your dataset will be exported to the SharePoint directory.
As a list (full list)
Limitations: Dataiku datasets can also be exported to SharePoint Online as lists. However, this operation will overwrite any existing list bearing the same name. Also, some types (such as lookup or calculated fields) do not exist in Dataiku and would therefore be replaced by strings. For these reasons, it is strongly recommended to export lists from Dataiku to SharePoint only on specific lists created with the intent of being updated by Dataiku. Keep in mind that any user modification on the SharePoint side will be overwritten at the next sync.
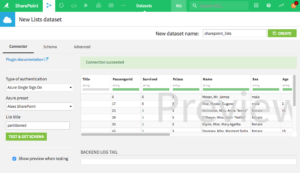
- Create your destination list by creating a SharePoint Online list dataset ( +Dataset > SharePoint Online > Lists ). Select the appropriate authentication and list title. Check that this title is not already in use on SharePoint to avoid any deletion. Project variables in the title, such as
DSS_${projectKey}_can help reduce conflicts in the name space. - Name the Dataiku dataset and click Create. An error should show because the dataset does not exist on the SharePoint side.
- In you flow, create a sync recipe from the dataset you want to export. In the Output dataset section, use Existing dataset and select the SharePoint dataset named at step 2.
- Click Run to start the export.
As a list (incremental)
A Dataiku dataset can be appended to an existing list, using the Append to list recipe.
- In your project’s flow, click on the dataset to append to the SharePoint Online list
- Once the dataset highlighted, click on Plugin recipes > SharePoint Online > Append to list at the bottom of the right panel
- Set an output dataset. This dataset will only contain a copy of the lines that are appended to the SharePoint Online list. In no case the recipe’s output dataset should be the actual SharePoint list. It can be stored into anything convenient.
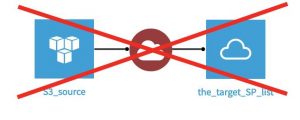
The output of the append recipe should never be the SharePoint list itself 
Flow for appending to a SharePoint list. Note that the output of the recipe is not the actual list. - Select an active authentication preset and type the name of the existing SharePoint Online list to append to.
- Press run, and the content of the dataset will up appended to the list
Note that :
- Upload speed can be increased by using multiple workers. However, this will result in the lines being appended in random order.
- To trigger the upload from a scenario, use a step to build the recipe’s output dataset.