


Plugin information
| Version | 1.2.4 |
|---|---|
| Author | Dataiku (Alex Bourret) |
| Released | 2022-08-04 |
| Last updated | 2025-03-11 |
| License | Apache Software License |
| Source code | Github |
| Reporting issues | Github |
Description
Import your PI System data into Dataiku, process and export the results. You will be able to:
- Explore the elements and attributes present on your PI System server Asset Framework
- Retrieve the metrics from your PI server on your Dataiku instance
- List event frames and retrieve their aggregated or detailed metrics
- Write data to an Asset Framework attribute
More information can be found in the reference documentation pages.
Disclaimer: most of the features of this plugin require Dataiku 10.0.4 or above.
Flow examples
List attributes first and retrieve their data later
The Attribute search custom dataset offers some flexibility for searching attributes, however, this might not be enough in some cases.
- You might want to filter out some attributes from a generic search
- You might want to join two series of attributes that can’t be described in one search
- You might want to alter some information in the attributes paths
- …
For these complex cases, the whole search and retrieve operation can be decomposed into several steps inside your flow, for instance
- retrieving the list(s) of attributes
- modify the list using a prepare recipe
- and finally, download the actual metrics for these attributes

For the first step, simply create an PI System Attribute search dataset, and perform the attribute search. This time, leave the Retrieve data option unchecked. This will result in only the list of attributes being downloaded.

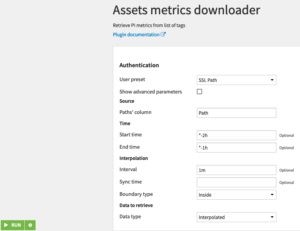
Next, use any visual recipe (join, prepare…) to perform the necessary modifications to the attribute list. Once this is done, click on the resulting dataset, and in the right panel Plugin > PI System > Assets metrics downloader. In the download recipe, set the data type and time span details regarding the actual metric download.
Finally, you can run the recipe and retrieve the data.
Go from long format to columns of synchronized attributes
Data retrieved from your PI server is either linked to one attribute or contains timelines of several attributes stacked one after another (also called “long format”). For many analyses, it can be necessary to convert from a long format to a timestamp/path array. Also, timestamps are probably slightly out of sync with one another, and in order to compare the values, one has first to align the existing timestamps.
This can all be done in one step using the Transpose & Synchronize recipe.
- in your flow, select the dataset that needs to be transposed and synchronize, then in the right panel click on Plugin recipes > PI System > Transpose & Synchronize. Create the output dataset, and Create.
- Fill in each box with the right column box, which is likely to look like on this screenshot:
- In Full path to reference attribute, set the path to the attribute that will be used as a time reference.
- Run the recipe, et voilà ! Each attribute is now in its own column, all timestamps are all aligned on the reference attribute, and the value is the last one recorded for the given timestamp.
Parameterized paths, to reuse a flow in several contexts
Once your flow is working on one site, you might want to be able to run it on another installation. This means parts of the path might need to be modified.
The whole flow can be made more portable by replacing specifics, such as the name of the server, database, or parts of the paths, with project-wide variables.
This can be done by using the 3 step approach described above. This time, use a prepare recipe between the list building stage and the metric download. In this recipe, add a formula for replacing sections of the path, for example, the server, with a variable such as ${pi_server}.
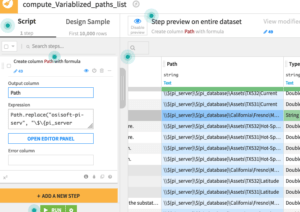
Your flow can now be adapted very quickly to a new environment just by changing the pi_server project variable.
Retrieve metrics continuously (well, almost continuously…)
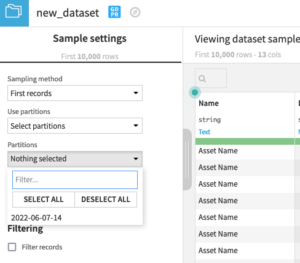
Retrieving metrics over a long period of time can be problematic in terms of server and network constraints. It is however possible to retrieve data periodically and store it in partitioned datasets. These datasets can be partitioned by date (year, month, day, or hour). For instance, to retrieve data every hour, the following steps can be taken:
- In your flow, create an PI System “Attribute search” dataset. Set it so it retrieves the assets’ paths you are interested in. Activate the “Retrieve data” option, and set the time interval between now (*) and one hour ago (*-1h).
- Go back to the flow, select the attribute search dataset, click on the Sync visual recipe, and create a new dataset.
- In the Sync recipe, click on the name of the newly created destination dataset, then Settings > Partitioning > Activate partitioning > Add time dimension. Select “Hour” as a period, and click Year, Month, Day, and Hour to add to the pattern. The pattern should now read %Y/%M/%D/%H/.*
- Save and go back to Parent Recipe
At this stage, clicking run would now retrieve one hour’s worth of data and put them in a Year / Month / Day / Hour partition. This partition can be selected or filtered out using the sampling settings panel of the dataset.
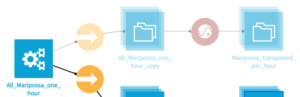
We now need Dataiku to run the sync for us once every hour.
- In the project, click on Scenarios > +New scenario and create a sequence of steps
- Activate the auto trigger, add a Time-based trigger repeating every hour
- Go to Steps > Add step > Build / Train. Add the name of the synced partitioned dataset, and put PREVIOUS_HOUR in the Partitioning: Date box.

The following recipes, such as transposition, can also be partitioned in order to process data incrementally. Simply select the same type of partitioning when creating the target dataset, and add the dataset to the scenario build step with PREVIOUS_HOUR partitioning date.
Write data from Dataiku to PI server
Information can be sent back from Dataiku to the PI server, on attributes for which the user account has write access. To do so, prepare the information to be sent back into a dataset containing the following columns:
- Timestamp: contains the date of the value to be displayed. If this column does not exist, the time for the value point will be the time of the upload.
- Value: contains the value to be displayed on PI Server
Next, create a custom dataset in the project flow, by clicking +Dataset > PI System > PIWebAPI toolbox. In Object path / Tag, set the full path to the attributes in which the data points will be written. Set Data type to Value. Press Test & Get Schema and Create. Finally, create a Sync recipe from the dataset containing the information to the PI System custom dataset, using the “Use existing” tab. The data points will be uploaded to PI System each time the sync recipe is run.