
Plugin Information
| Version | 2.0.3 |
|---|---|
| Author | Dataiku (Henri Chabert) |
| Released | 2021-06 |
| Last updated | 2022-09 |
| License | Apache-2.0 |
| Source code | Github |
| Reporting issues | Github |
⚠️ Starting with Dataiku version 11 this plugin is partially superseded by the native image classification capabilities.
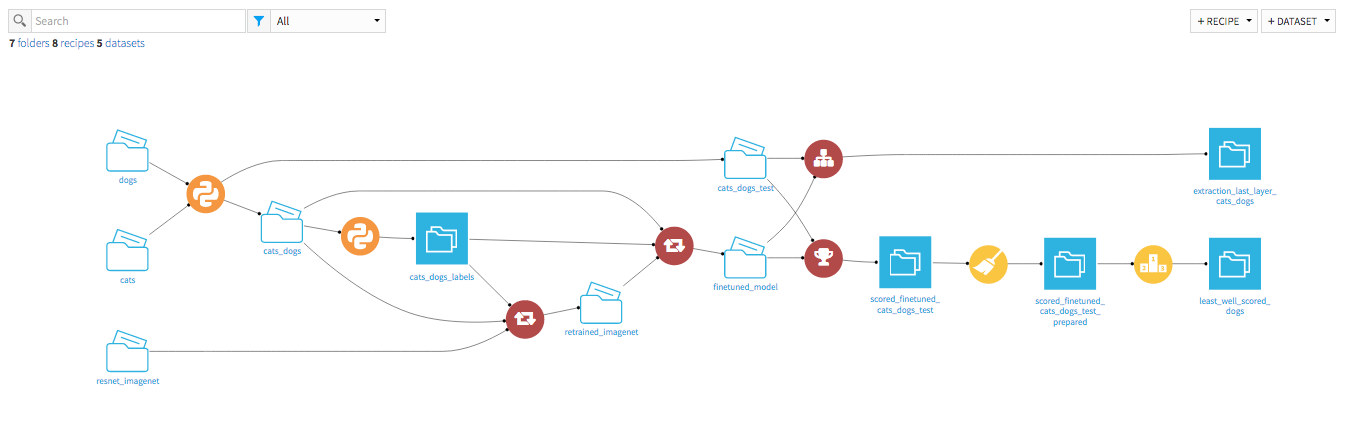
With this plugin, you will be able to classify you images without having to train a brand-new model. It can be done by downloading a pre-trained model from the web and then use it as it is, or retrain it to fit you own data. This plugin provides the following components:
- Recipes
- Image classification: Your model is ready? Well use this recipe to assign one or many labels to your images.
- Feature extraction: If you want to extract one of the layers of the CNN, this is your way to go!
- Model retraining: You are not happy with the performance of the model you downloaded on your data? Well try to retrain some layers of it with your own labels, the performances can only be better!
- Macros
- Model download: Choose between 9 different models trained on the famous ImageNet dataset, the one that is more likely to perform on your data.
- API endpoint generation: Whenever it is time to get your model to production, you can directly deploy an API endpoint on an API node and use this endpoint to score any images on your website or your app.
- Webapp
- Tensorboard webapp: Want to know how the re-training went? What could be improved? Use this Tensorboard webapp to visualise the training performances and metrics.
Note: Though the previous version was split in two to handle GPU (One plugin for CPU and the other one for GPU) , the new version of tensorflow allows to use both GPU or CPU in the same plugin.
How to set up
Right after installing the plugin, you will need to build its code environment. If this is the first time you install this plugin, click on Build new environment.

Note that Python version 3.6 is required, with system development tools and Python interpreter headers to build the packages. You can refer to this documentation if you need to install these beforehand.
Warning: if you were previously using the former deep-learning image plugin (CPU or GPU) and now want to use this new deep-learning plugin instead, you will need to update the existing flows with new recipes and re-download the pre-trained models.
How to use
1. Images classification (recipe)
Classify images stored in any data storage (local or cloud providers).

Inputs:
- Image folder: Folder containing the images you want to classify. Files that are not images will be considered as errors but will not break the job.
- Model folder: Folder containing the model with which to classify the images. This folder must be either downloaded by the macro Download pre-trained model (v2) or the output of the retraining recipe.
Output:
- Dataset with the predictions:
- images: The path of the image
- prediction: The labels and their prediction probability for each image
- error: Whether there has been an error loading the file (See logs for more details)
Settings

General parameters
- Max number of class labels: The maximum number of labels an image can have.
- Value 1 will assign the label with the maximum probability
- Value 3 will assign the three most probable labels
- Min probability threshold: The limit under which the label will not be added to the image
- Value nothing will not filter any label, even though they are very improbable
- Value 0,3 means that every label that has a probability less than 30% to be correct will not be added to the image
This section is not visible if you do not have any GPU on the machine on which you are running Dataiku.
- Use GPU: Specify whether you would like to use the GPU(s) on the machine for the recipe
- GPU Usage: Choose which GPU(s) you would like to use
- Use all GPU(s): All GPU(s) will be used without any filtering
- Use a custom set of GPU(s)…: Select only some GPU(s) to use
- ↳ Select GPU(s) to use: Use this multi-select to specify which GPU(s) you want to assign to the job
- GPU Memory: Select how you would like the GPUs memory to be handled
- No limitation: The entire GPU will be assigned to the job. No other process will be able to use it
- Allocate memory automatically: Let Tensorflow determine the memory it needs. The limit changes dynamically so you cannot know before how much memory will be allocated
- Set a custom memory limit…: Set yourself the percentage of the GPU to allocate. All the GPUs will have the same percentage
- ↳ Memory limit per GPU: Use the cursor to select the percentage you want
2. Features extraction (recipe)
Extract the features coming from any layer of a pre-trained deep-learning model.

Inputs:
- Image folder: Folder containing the images you want to extract de features from. Files that are not images will be considered as errors but will not break the job.
- Model folder: Folder containing the model with which to extract images features. This folder must be either downloaded by the macro Download pre-trained model (v2) or the output of the retraining recipe.
Output:
- Dataset with the predictions:
- images: The path of the image
- prediction: A vector with one float per neuron in the input chosen model’s layer
- error: Whether there has been an error loading the file (See logs for more details)
Settings

General parameters
- Select extracted layer: The layer of the input CNN you want to extract the features from
- You can click on “SHOW MODEL SUMMARY” to see the layers composing the model
- The number of features extracted will depend on the layer you extract
GPU
This section is not visible if you do not have any GPU on the machine on which you are running Dataiku.
See Image classification GPU section for more information
c. Model retraining (recipe)
Partially retrain a model to fit your own data, and parametrize it the way you want.

Inputs:
- Label dataset: Dataset containing the mapping between your training images and their label. It should then contain at least two columns
- One with the paths to your images
- One with the image’s label
- Image Folder: Folder containing the images you want to train the model on. Files that are not images will be considered as errors but will not break the job.
- Model folder: Folder containing the model to partially retrain. This folder must be either downloaded by the macro Download pre-trained model (v2) or the output of the retraining recipe.
Output:
- Folder with files representing the retrained model
- config.json: Main characteristics of the model
- model_info.json: Summary of the model retrained and before retrain
- model_labels.csv: Distinct labels of input label dataset
- model_weights_notop.h5: Weights of retrained model
- tensorboard_logs/ (optional): Files used by Tensorboard Webapp (only if you selected the related option)
Settings
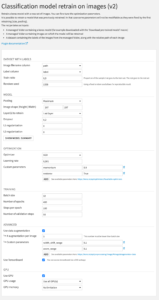
Dataset with labels
- Image filename column: Name of the column containing the path to images
- Label column: Name of the column containing the label of each image
- Train ratio: Proportion of input images to use in the train set (the others will be used in the test set)
- Random seed: Seed to get reproducible results
Model
- Pooling: Max pooling operation for 2D spatial data
- Image shape (Height | Width): Shape of images classified by retrained model
- Layer(s) to retrain: Specifies which layers will be retrained
- Dropout: Dropout to apply to the input
- L1 regularization: L1 regularization penalty to apply
- L2 regularization: L2 regularization penalty to apply
Optimization
- Optimizer: Specifies the optimizer algorithm to use
- Adam: Optimizer that implements the Adam algorithm
- Adagrad: Optimizer that implements the Adagrad algorithm
- SGD: Gradient descent (with momentum) optimizer
- Learning rate: Learning rate for the training
- Custom Parameters: Additional parameters for the selected optimizer. You can see available parameters there: https://keras.io/api/optimizers/#available-optimizers
Training
- : Number of samples per batch of computation
- : Number of epochs to train the model
- : Total number of steps (batches of samples) before declaring one epoch finished and starting the next epoch
- : Total number of steps (batches of samples) to draw before stopping when performing validation at the end of every epoch
Advanced
- : Specifies whether to use data augmentation during training. This will generate transformations of the input images based on what you set up
- # augmentation per image: Number of additional images to generate for each image
- Custom Parameters: Additional parameters for image generation. You can see available parameters there: https://keras.io/api/preprocessing/image/#imagedatagenerator-class
- : Specifies whether to save Tensorboard logs in order to visualize training in a Tensorboard webapp
GPU
This section is not visible if you do not have any GPU on the machine on which you are running Dataiku.
See Image classification GPU section for more information
d. Model download (macro)
Download a pre-trained model from available Keras Applications
Settings

General parameters
- Output managed folder: Where to save the downloaded model.
- Use a different folder for each model you download
- You can also create a new folder by selecting “Create new Filesystem folder…”
- Pre-trained model to download: Choose the model to download. Available are:
e. API endpoint creation (macro)
Deploy your scoring to an API Node in order to use it either on your website or your app
Settings
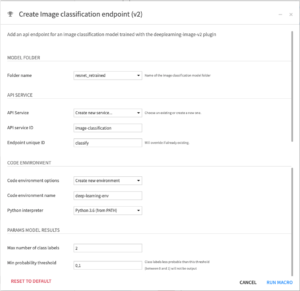
Model folder
- Folder name: Name of the folder containing the model to use for the classification
Api service
- : Service in which to save the endpoint
- You can create a new service by selecting “Create new service…”
- API service ID: The ID of the new service to create
- Endpoint unique ID: The ID of the new endpoint
- If an endpoint with this ID already exists, it will be overwritten
Code environment
- Code environment options: Code environment under which the classification will be executed
- If selecting an existing Python code env, make sure the right packages are installed:
           scikit-learn==0.23.1
           tensorflow==2.2.0
           h5py>=2.10.0
           Pillow==8.1.1
           tables==3.6.1
           GPUtil==1.4.0
- You can also choose to create a new Python virtual environment. If so, choose the name of this environment and the interpreter
Params model results
See Image classification settings section for more information
f. Tensorboard vizualization (webapp)
Visualize your training preogression

Settings

General settings
- Folder containing retrained model: The folder containing Tensorboard logs.
- Only folders with a folder named
tensorboard_logsare displayed
- Only folders with a folder named
Examples
Some projets that use the Deep-learning image plugin have been developed: