


Plugin information
| Version | 1.2.3 |
|---|---|
| Author | Dataiku (Alex Bourret) |
| Released | 2021-04-23 |
| Last updated | 2025-01-23 |
| License | Apache Software License |
| Source code | Github |
| Reporting issues | Github |
How to set up
There are two presets to be used in combination with the API Connect plugin: one deals with authentication, the other with the API’s endpoint. Each preset items generates variables that can be reused in other preset items using the {{variable_name}} notation. So for instance if a {{username}} is generated by the authentication preset, it can be reused for instance as https://service.com/user/{{username}}/details in the URL section of the endpoint preset.
Setting up the authentication preset(s)
The plugin currently support two authentication modes: Basic access authentication and tokens.
- Basic auth generates the
{{username}}and{{password}}reusable tokens. Both parameters will be used for all requests when this authentication preset is selected. - API Key: This setting will let you insert an authentication token, as a key/value couple, either in query parameters or the headers of each API call
- Bearer token: generates a
{{token}}variable. You then need to use it wherever appropriate inside in headers or query parameters.
Other key/values can be added if necessary, for instance to add client_id / client_secret information. These keys then then be reused in query string or headers using the same templating approach.
Note that people you share the authentication preset with will be able to read in clear any information it contains (password, secret id…)
How to use
Dataset
In your flow, select +Dataset > API Connect > Custom Rest API dataset. First, select the credential preset, or use manually defined to set your own. Next, set up the API call parameters.
You will need to refer to the documentation of the targeted API in order to find the right parameters:
- URL template: template defining the endpoint to access. This can be the raw URL (e.g. “https://prod.myservice.com/user/john.doe/data”). It can also be used as a template, using variables such as those introduced by the authentication preset (e.g. “https://{{environment}}.myservice.com/{{username}}/data”).
- HTTP method is the verb used for the API call (GET, POST, PUT, BATCH or DELETE)
- Query params: all the query strings, as key/value, that will be used in the URL for accessing the endpoint. The value is used as a template by the plugin, so can contain variables as well.
- Headers: uses the same mechanism as for query parameters
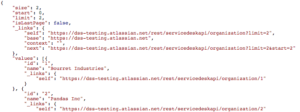
- Path to data array: Dot separated list if keys pointing at the array containing the data of interest in the returned JSON. If we consider the following return JSON data:

Example of JSON data returned from an API endpoint The payload of interest for your DSS dataset is the part presented as an array, contained between square brackets […]. The key pointing to this array is in this case
values. - Ignore SSL check: to be used when accessing an HTTPS endpoint which root certificate is not recognized by your DSS instance.
- Timeout in seconds
- Rate limit in requests per minute
- Pagination mechanism. This defined the method used to paginate the retrieved information across several API calls.
- Next page URL provided: to be used where the URL to the next page is contained in the API’s returned JSON content. You will need to provide the JSON path to this URL.
- In the example above, the next URL is contained by the key “next”, itself contained in a dictionary which key is “_link”. For this specific endpoint, the path will be
_links.next. - In cases where a key contains a dot, the notation for this key is
["key.with.dot"]. For instance if the structure is{'Paging':{'@odata.nextLink':'http://...then the next URL key will bePaging.['@odata.nextLink']. - For APIs using the RFC5988 method for pagination, just leave this box empty.
- In the example above, the next URL is contained by the key “next”, itself contained in a dictionary which key is “_link”. For this specific endpoint, the path will be
- Offset pagination
- Per page
- Next page URL provided: to be used where the URL to the next page is contained in the API’s returned JSON content. You will need to provide the JSON path to this URL.
Recipe
The recipe works on the same general principle as the dataset. The difference is that the API parameters are now taken from an input dataset. The recipe will send as many requests to the API as there are rows in the dataset, changing the parameters accordingly for each of them.
The recipe’s interface is used to select the columns that will be used in the API calls, and if necessary rename them.
The recipe will makes an API request for each row of the input dataset. Each request’s endpoint, header and query string are build with the templates defined in the select endpoint preset, and the information contained in all the columns for this row. Each column name is reused to generate a variable {{column_name}} containing the value for this row / column.
Variables can be renamed, using Variables columns renaming, to match a column name with an existing variable in a preset.
The recipe does not fail on HTTP error. Instead, for each call in error, an error column will be generated.
The secure SSO credentials
Limitations
- All information stored in the authentication presets (password, secret id…) can be read in clear by anyone it is shared with.