Your terminal deserves better: build a Dataiku admin TUI with Textual
September 24, 2026/15 min read/Thierry Chantier
Tired of juggling between your terminal and 15 browser tabs to monitor your favorite applications? If you find absolute comfort in a zsh or tmux window, but feel that traditional command lines sometimes lack depth for complex monitoring, this article is for you.
Welcome to the era of Textual User Interfaces (TUI): the raw power of the terminal combined with the ergonomics of a graphical interface.
In this article, we won't just stick to theory. We'll get our hands dirty and build a TUI administration tool for Dataiku step by step.
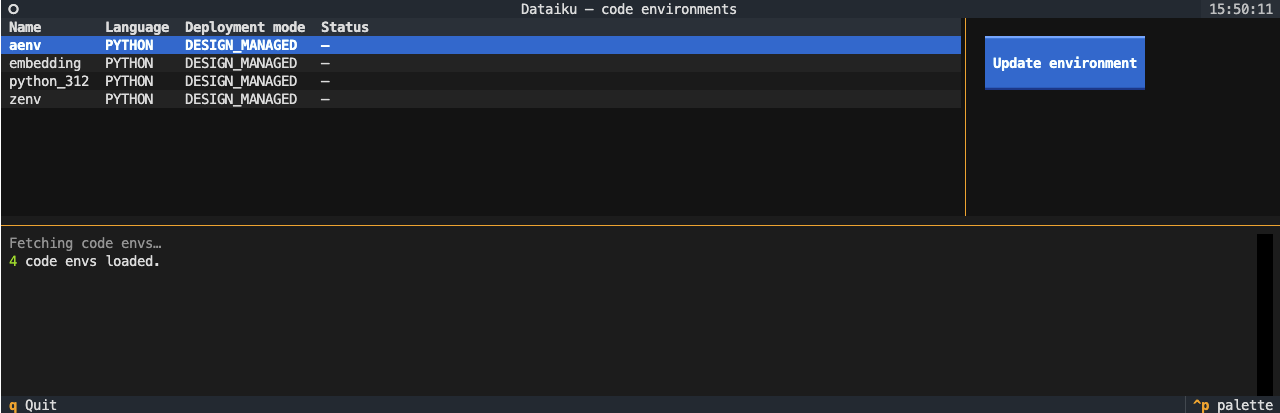
Here is a quick look at what we are going to build.
There is quite a long history of interfaces between humans and machines. We can even start with the Jacquard looms with punch cards. The thing is, keeping a simple way to interact with computers has been a recurring topic, leading to the development of sophisticated interfaces for desktop applications and websites. Still, the world of terminal tools has never ceased to evolve.
A very common way to interact with a computer in a terminal is through a command-line interface. CLI is the perfect tool for a single question, for example: “list my code environments”. But what happens if you need several iterations of actions? For example: “List my code environments. Choose this environment. Update this environment.”
TUI apps are designed to help you get the most out of your device, using the full size of your terminal space. The idea is to provide all the information you need, present it in a user-friendly way, and allow you to interact with it.
Compared to a full desktop application, you will end up with a very lightweight TUI application. It will start in a breeze. You will be able to use it through SSH connections. As they are based on text content, they are very accessible to screen readers, and the content will scale with your font.
Users who live in their terminal will love this kind of application. And once you’ve tasted TUI applications, everyone can be that kind of user.
Over the years, many frameworks and tools have emerged. There's a chance you have a framework for your language.
If you work with Go, your TUI framework will certainly be BubbleTea. Created and maintained by Charm, this framework is based on the Elm architecture: Model, Update, View. The CLI part will benefit from libraries such as Cobra, which is a battle-proven tool. The ecosystem around BubbleTea is very rich. You will find many Bubbles, which are more complex components, to suit your application’s needs. Styling will be handled using the Lip Gloss library.
All those libraries and components will be gracefully used in a very expressive and declarative way. Thanks to Go, you can also cross-compile your application and ship a single binary for each user's operating system.
With the rapid growth in the use of Rust, it was only a matter of time before a TUI library emerged. This was the case with the birth of Ratatui. And yes, it is obviously related to a famous animal in a cartoon movie. Following the philosophy of the Rust ecosystem, you will assemble several libraries together to achieve your TUI goal. Ratatui will orchestrate the TUI components. Crossterm will be responsible for the low-level operations of your terminal. All the CLI elements, like parsing your command line, can be handled by Clap.
You will benefit from the performance often induced by the Rust ecosystem. It is one of the most efficient tools for applications requiring high refresh rates.
In the Python universe, Textual is certainly the king of TUI libraries. Everything started with the creation of a library to help a CLI application have a nicer look: Rich. At the time I discovered Rich, I was architecting complex build workflows, and having a terminal tool to render the different messages I needed properly was a game-changer. Textual was then built on top of the strength of Rich, allowing for a very large library of built-in widgets and components. If you complete this duo using the Typer library for the CLI part, you will have everything you need to start and evolve.
In a technical world full of Python SDKs and AI tools, having a way to use them in your terminal is a real killer. As usual with Python tools, you will have a very low cost of learning and still have the power to push to a complex application later.
For the purposes of this article, I will focus on the Python ecosystem and show you how to build your first TUI application. But remember: the best language is the one you are efficient in a given use case, with a given team.
Dataiku brings analytics, models, and AI agents together in a single governed system — so enterprise AI runs with orchestration, visibility, and control from day one.
Such a platform offers many features, and you can interact with it via an API. Among those features are code environments for recipes, notebooks, and Code Studios. Those code environments are using a Python environment with packages you can add to fulfill your purpose.
We are going to build an admin tool for a Dataiku instance. Using Python and Textual, we will build a TUI application that lists code environments, lets us navigate to and select one, and shows its details.
Before diving into the code and the explanations, you need to prepare a few elements. First, create a Python virtual environment. This can be done with the help of the wonderful tool called uv from Astral, and is a pretty straightforward process.
I suggest you create a virtual environment with a recent version of Python, such as 3.12. Once you have an active virtual environment, you need to add 3 packages:
dataiku-api-client: provides access to your Dataiku instance through the official API.
textual: the tool to build the TUI for your application. Note: the rich package is included in this dependency.
typer: the key to managing your CLI.
To install the package, you can use any of your usual Python processes. For the purpose of this article, a single command will be enough:
uv pip install dataiku-api-client textual typer
I suggest you have a look at Astral's guide on working on projects for more advanced methods.
The final element of your preparation is an API key for interacting with your Dataiku instance. This API key needs to have the Manage all code envs permission. For more information, please read the documentation about API keys. For the purpose of this article, store the API key in an environment variable named DSS_API_KEY. You will also need to have an environment variable named DSS_HOST to store the URL of your Dataiku instance.
Congratulations, you are now ready to dive into the code!
When you need to create an application for your terminal, you'll likely start by using a CLI. This has the advantage of forcing you to separate the command-line parsing, the “getting the data”, and the way you will display it.
So let’s have a look at what Typer provides as a foundation for a CLI. Create a new file: src/step1.py
# src/step1.py
import typer

app = typer.Typer(help="Admin helpers for a Dataiku DSS instance.")

@app.command("hello")
def hello(name: str = "world") -> None:
   """A command is just a function."""
   print(f"Hello {name}")

if __name__ == "__main__":
   app()
Typer uses type-annotated functions to provide CLI commands. Under the hood, those few lines of code are enough to have all the built-in benefits of Typer. To see it clearly, type the following command:
python src/step1.py --help
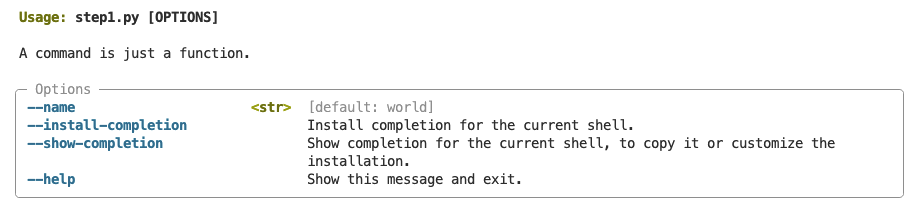
Thanks to Typer, you already get proper --help, argument parsing, and shell completion for free.
Note:
All the code you will find here can be found at https://github.com/datapond-blog/tui-discovery
Now all the fun begins. We need to connect to a Dataiku instance and list the code environments. To do so, let’s create additional files to help you.
First, we need to have the configuration elements. Add these to a new file: src/helpers/config.py
import os


host = os.environ.get("DSS_HOST", "http://localhost:11200")
api_key = os.environ.get("DSS_API_KEY", "replace_me")
There are different approaches when it comes to defining secrets and configuration information. Here, we chose to allow the usage of shell variables with a possible fallback to default values.
The second file you need to create is src/helpers/dss_helpers.py:
import dataikuapi


from helpers import config


def client() -> dataikuapi.DSSClient:
   return dataikuapi.DSSClient(config.host, config.api_key)


def list_code_envs() -> list[dict]:
   """Raw code env descriptions from the DSS API."""
   return client().list_code_envs()
Everything that talks to Dataiku lives here. Keeping API calls out of the UI code makes the same functions usable from the CLI and the TUI. As a rule of architecture, always try to separate topics into different files. This separation of concerns will result in a clean architecture that allows easy evolution thanks to its modularity.
You now have a client object representing the connection to your Dataiku instance, and a list_code_envs method for raw access to code environments.
At this stage, we are going to render this list through Rich thanks to its built-in Table object. By choosing this approach, we will be able to migrate smoothly to Textual for the UI.
To implement the components that will render the information we need to expose, create the file src/helpers/components.py.
from rich.table import Table


from helpers.dss_helper import list_code_envs


LANG_STYLE = {"PYTHON": "cyan", "R": "magenta"}


def build_code_envs_table(envs: list[dict]) -> Table:
   table = Table(title="DSS code environments")
   table.add_column("Name", style="bold")
   table.add_column("Language")
   table.add_column("Deployment mode")


   for env in envs:
       lang = env.get("envLang", "?")
       table.add_row(
           env.get("envName", "?"),
           f"[{LANG_STYLE.get(lang, 'white')}]{lang}[/]",
           env.get("deploymentMode", "-"),
       )
   return table


def get_code_envs_table() -> Table:
   return build_code_envs_table(list_code_envs())
And you can assemble it through a new command that you will write in a new file src/step2.py.
# src/step2.py
import typer
from rich.console import Console
from helpers.components import get_code_envs_table


app = typer.Typer(help="Admin helpers for a Dataiku DSS instance.")
console = Console()


@app.command("hello")
def hello(name: str = "world") -> None:
   """A command is just a function."""
   print(f"Hello {name}")


@app.command("envs")
def envs() -> None:
   """List the code environments of the instance."""
   console.print(get_code_envs_table())


if __name__ == "__main__":
   app()
The Console object from the Rich package provides access to the terminal rendering.
It is able to render any Rich component, such as the table we use here.
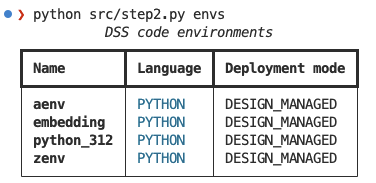
You now have a real table, in color, in a few lines of code. Isn’t that great?
Let’s figure out and launch:
python src/step2.py envs
Before moving to the Dataiku TUI app, let’s see what the basic Textual app code looks like. Create a new file src/step3.py.
# src/step3.py
from textual.app import App, ComposeResult
from textual.widgets import Footer, Header, Static


class AdminTui(App):
   TITLE = "Dataiku — code environments"
   BINDINGS = [("q", "quit", "Quit")]


   def compose(self) -> ComposeResult:
       yield Header(show_clock=True)
       yield Static("Hello DSS")
       yield Footer()


if __name__ == "__main__":
   AdminTui().run()
The layout of the TUI widgets is done in the compose() method of the App object. It is a declarative way of designing the interface you need. The widgets are yielded because compose() is a generator.
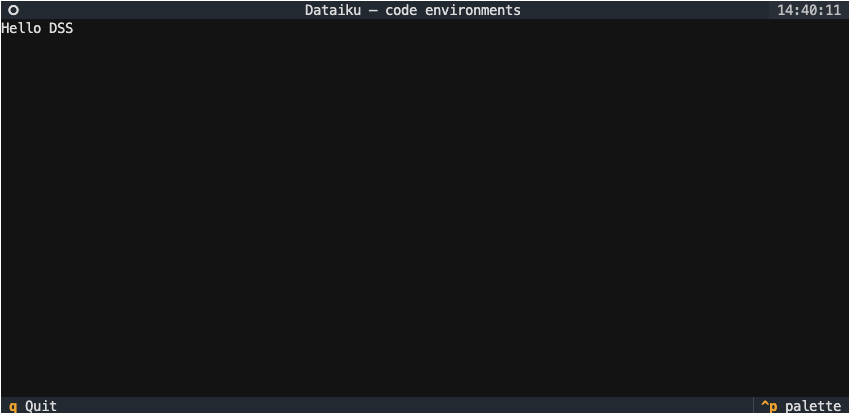
Textual has built-in features you don’t need to code, like the command allowing access to a palette menu that will expose tools like a theme selector or a screenshot action.
Note that we use 2 Textual App variables:
TITLE is used to specify the text used to fill the upper section of your application, represented by the Header widget
BINDINGS is a map of keys to an action method. The Footer widget will expose it to your users. The three parameters are:
The key used
The method to call
The label to show in the Footer.
We are now going to reuse the table we coded during step 2. But before we enrich our TUI, let’s create our CLI to launch all the commands we’ve seen so far in the file src/step4.py:
# src/step4.py
import typer
from rich.console import Console
from helpers.components import get_code_envs_table
from helpers.tui import AdminTui


app = typer.Typer(help="Admin helpers for a Dataiku DSS instance.")
console = Console()


@app.command("hello")
def hello(name: str = "world") -> None:
   """A command is just a function."""
   print(f"Hello {name}")


@app.command("envs")
def envs() -> None:
   """List the code environments of the instance."""
   console.print(get_code_envs_table())


@app.command("tui")
def tui() -> None:
   """Open the interactive admin interface."""
   AdminTui().run()


if __name__ == "__main__":
   app()
You can now create the TUI in a dedicated file, starting with what we coded during step 3, and we will add the table. Create the file src/helpers/tui.py
from textual.app import App, ComposeResult
from textual.widgets import Footer, Header, RichLog, Static


from helpers.components import get_code_envs_table


class AdminTui(App):
   TITLE = "Dataiku — code environments"
   BINDINGS = [("q", "quit", "Quit")]
   CSS = """
   #table { width: 3fr; }
   #sidebar { width: 1fr; min-width: 32; border-left: solid $accent; padding: 1 2; }
   #details { height: 1fr; }
   #log { height: 10; border-top: solid $accent; padding: 0 1; }
   """


   def compose(self) -> ComposeResult:
       yield Header(show_clock=True)
       yield Static(get_code_envs_table(), id="table")   # the Rich table from step 2
       yield RichLog(id="log", markup=True, wrap=True)
       yield Footer()
We replaced the text content of the Static widget of step 3 with the table from step 2.
The styling uses the same conventions as CSS. The creator of Textual, Will McGugan, chose this approach because he thought it was already battle-tested.
Launch your brand new TUI with the command:
python src/step4.py tui
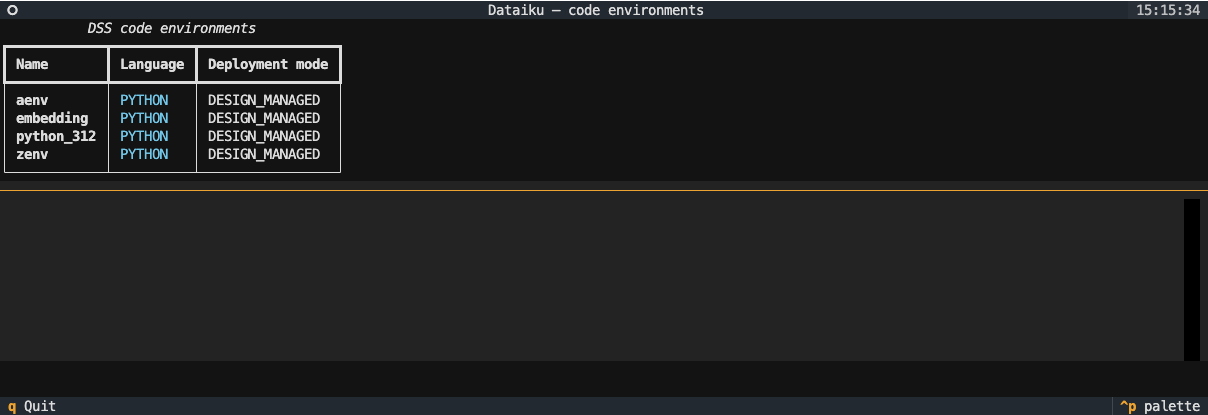
The application shows the information, but it is not very interactive. In a Dataiku instance with many code environments, rendering needs improvement. The solution is to add a scrollable, navigable, and dynamic widget: DataTable.
To do this, we need to modify our src/helpers/tui.py file:
from rich.markup import escape


from textual.app import App, ComposeResult
from textual.containers import Horizontal, Vertical
from textual.widgets import Button, Footer, Header, RichLog, Static
from textual.widgets import DataTable
from textual import work


from helpers import dss_helper
from helpers.step2_components import get_code_envs_table


class AdminTui(App):
   TITLE = "Dataiku — code environments"
   BINDINGS = [("q", "quit", "Quit")]
   CSS = """
   #table { width: 3fr; }
   #sidebar { width: 1fr; min-width: 32; border-left: solid $accent; padding: 1 2; }
   #details { height: 1fr; }
   #log { height: 10; border-top: solid $accent; padding: 0 1; }
   """


   def compose(self) -> ComposeResult:
       yield Header(show_clock=True)
       with Horizontal():
           yield DataTable(id="table", zebra_stripes=True)
           with Vertical(id="sidebar"):
               yield DataTable(id="table", zebra_stripes=True)
               yield Button("Update environment", id="update", variant="primary")
       yield RichLog(id="log", markup=True, wrap=True)
       yield Footer()


   def on_mount(self) -> None:
       self.envs: dict[str, dict] = {}
       self.selected: str | None = None


       table = self.query_one("#table", DataTable)
       table.cursor_type = "row"
       for label in ("Name", "Language", "Deployment mode", "Status"):
           table.add_column(label, key=label.lower())
       self.action_refresh()


   def action_refresh(self) -> None:
       self.load_envs()


   @work(thread=True, exclusive=True, group="load")
   def load_envs(self) -> None:
       """Blocking API call, run off the UI thread."""
       self.call_from_thread(self.write_log, "[dim]Fetching code envs…[/dim]")
       try:
           envs = dss_helper.list_code_envs()
       except Exception as exc:
           self.call_from_thread(self.write_log, f"[red]{escape(str(exc))}[/red]")
           return
       self.call_from_thread(self.populate, envs)


   def populate(self, envs: list[dict]) -> None:
       table = self.query_one("#table", DataTable)
       table.clear()
       self.envs.clear()
       for env in envs:
           key = f"{env['envLang']}/{env['envName']}"
           self.envs[key] = env
           table.add_row(
               env["envName"], env["envLang"], env.get("deploymentMode", "-"), "—",
               key=key,
           )
       self.write_log(f"[green]{len(envs)}[/green] code envs loaded.")


   def write_log(self, message: str) -> None:
           self.query_one("#log", RichLog).write(message)
We replaced the table used since steps 2, 3, and 4 with a DataTable. The zebra_stripes is a parameter that allows the table to alternate colors between each row. The layout is a bit richer, and you will understand why at the end of this article.
The table content is now loaded in the on_mount() method. It is run by Textual once the widgets exist, to populate them.
The API call to Dataiku is made synchronously. That’s the reason why you see a decorator before the load_envs() method. It allows the call to be done in a separate thread, outside of the UI rendering thread. The parameter exclusive=True is here to cancel the previous run of the same group to avoid hammering the refresh queues up in an uncontrolled manner.
Our shiny TUI application now has a proper table to show the code environments, and you can navigate through the list.
You are now able to develop your own TUI application and create new tools that suit your needs.
If you are willing to push a little further, have a look at our UI.
Yes, you have seen it: we added a button called Update environment
You can connect a specific action to this button to call the API that updates the code environments.
Challenge accepted? Do not hesitate to reach out to us if you have any questions or if you want to propose a solution to this challenge!
Remember, you will find clues in https://github.com/datapond-blog/tui-discovery.