


This plugin sends mails to a list of people stored in a dataset.
It takes as input a contacts dataset containing a row per email to send. It can also include other datasets, as CSV or Excel attachments in the email. It also supports templating, so the email content can be customized, based on the data contained within each row in the contacts dataset, as well as the first 50 rows of the attachments datasets.
Plugin Information
| Version | 1.0.0 |
|---|---|
| Author | Dataiku |
| Released | 2015/11/15 |
| Last updated | 2023/04/03 |
| License | Apache Software License |
| Source code | Github |
| Reporting issues | Github |
How To Use
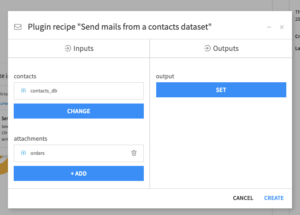
A recipe component is provided by this plugin. Create a recipe and select (1) the contacts dataset containing recipient email addresses and recipient specific information and (2) optionally, one or more attachments dataset for datasets you want to include as a whole.
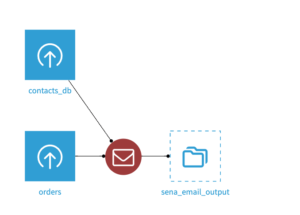
In the flow, this will create a recipe with all those inputs and an output dataset which reports on the success (or failure) that the email has been successfully transmitted to the SMTP Email Server.
You configure the recipe with the following form – more details follow on what to put in these sections.
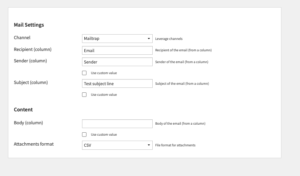
Mail settings
Channel – either choose an existing Dataiku channel configured for sending email (recommended), or choose “Manually define SMTP” to configure a mail server directly (if you choose this, the configuration options will appear in the same form – these should be self explanatory and depend on the STMP server you have chosen).
In the fields that follow this, there is often a choice between getting the value from a column in the contacts database, or using a custom value directly in the form. A checkbox called “use custom value” allows you to enter the value directly, and the prompt for a field will always end with “(column)” or “(value)” as appropriate to make this clear.
Sender – If the channel does not have a sender, or you have chosen “Manually define SMTP”, you can configure a Sender field. If the channel has a sender configured, as is typical, this field will not appear, and what is set in the channel will be user.
Recipient – the column to use with the email to send to (this field is always based on a column in the contacts dataset).
Subject – the column to use for the email subject, or the value to use for all emails. If you use a value it supports templating – you can use column names from the contact database – e.g. “Hello {{ Name }} – some news about {{ category }} ”
(Email addresses can be in the form: Name <[email protected]> or just [email protected].)
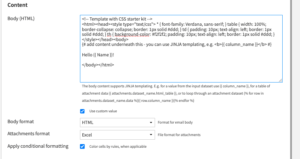
Content
Email Body – this can be driven from a column of the contacts database (always plain text, no templating), or a custom value (when “Use custom value” is selected). If you use a custom value, you can choose for it to be HTML or plain text, and templating is supported in both cases. There is more information below on templating.

Attachments format – choose whether to include the attachment datasets as CSV or Excel files. (Each dataset will be included whole as a separate attachment – be aware of file size for large datasets).
For Excel files an additional option may appear – “Apply conditional formatting”. Use this if you want the rows values you have highlighted in the explore view of your dataset with conditional formatting to appear in the attached Excel file (where it is possible – not all such formatting can be applied).
Templating
Several types of templating can be used in the email body (whether html or plain text). Simple templating is also available for the subject field. The following features are offered.
- Dataiku variables
If you use the pattern${dss_variable}you can inject a Dataiku variable, for example one set at the project level. - Contacts dataset column values
If you use the pattern{{ my_column_name }}– a simple double brace{{enclosed name – this can be used to reference a contacts dataset column. This means it will be replaced by the value of that column from the current row of the contacts dataset (the one for the recipient). - Basic HTML table of an attachment dataset
(Not applicable to the subject field)
You can inject a dataset – containing no more than the first 50 rows of an attachment dataset – as an inline HTML table with a tag like this:
{{ attachments.my_dataset.html_table }}
(Where you would replacemy_datasetwith the name of the attachment dataset.)
If the dataset his been shared from to this project from another project, you must include the project key of the original project in this variable:
{{ attachments.other_project_key.my_dataset.html_table }}This will include all the columns from that dataset. The look and feel of the inline HTML table can be controlled by CSS – the form field for the email body is pre-populated with some standard CSS you can use that will format this table. Note if there are many columns it could be very wide – but you can always remove columns from an attachment dataset with a prepare recipe before linking it to the send email recipe. - Custom rendering of attachment datasets
(Not applicable to the subject field)
The full JINJA templating syntax is exposed and the first 50 rows of each attachment dataset are available to drive the template. We will provide variable reference like this for each attachment dataset to expose the rows of data, so the user can work with this:
attachments.my_dataset.data
(wheremy_datasetwould be the attachment dataset name).
To render something for each row of the data exposed you can do something like this (standard JINJA syntax):
{% for row in attachments.my_dataset.data %}

<div>

{{ row.my_column }}<div>

{% endfor %}}
As a reminder if the dataset is from another project you must used the project key from this project to reference it – e.g.{% for row in attachments.other_project_key.my_dataset.data%}
Testing and sending email
When you run the recipe, it will of course try to send emails to everyone in the contacts dataset.
When developing a solution and testing content of the email we recommend you use a test dataset in place of the ultimate contacts dataset with a small number of recipient emails you can monitor to check the output. When results are as expected, you can change the contacts dataset, which is the first dataset in the “Input / Output” tab of the recipe.
The recipe will fail if it detects some general problems, but even if it succeeds, it is important to check the output dataset to confirm emails were sent for all recipients and troubleshoot any problem.
If the recipe jobs succeeds it does NOT guarantee that an email was sent to each recipient in the contacts dataset. It only confirms that Dataiku successfully delivered the message to the STMP Email Server.
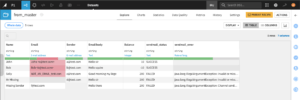
The output dataset will be a copy of the contacts dataset with two additional rows:
sendmail_status – SUCCESS or FAILED depending on the status
sendmail_error – normally empty, but if there is a failure, populated with an error message from the attempt to send the email which will allow you to troubleshoot the problem. Here is an example:
More information about the plugin is available in the Github repository